The absolute safety and consistency of sous-vide for chocolate work stem from its ability to transform tempering from a delicate art into a repeatable scientific process.
- It offers unparalleled temperature precision, eliminating the risk of scorching or seizing common with other methods.
- The sealed environment provides total process integrity, preventing contamination from water or steam.
Recommendation: Embrace the sous-vide protocol not just for tempering but for all temperature-sensitive preparations like infusions and custards to achieve flawless results every time.
The frustration is universal for any home cook who has delved into chocolaterie: a moment of inattention, a rogue drop of water, a slight temperature overshoot, and your beautiful, glossy chocolate turns into a grainy, dull, and unusable mass. For years, the solutions have been the same—a precarious double boiler that fogs up your kitchen, or a microwave that threatens to scorch your precious cocoa solids in seconds. These methods treat chocolate tempering as a temperamental art form, demanding constant vigilance and a fair amount of luck.
But what if the entire premise was flawed? What if the key to perfect chocolate wasn’t about mastering an imprecise art, but about controlling the scientific variables with absolute precision? This is the fundamental shift offered by the sous-vide method. By leveraging the principles of thermal inertia and process integrity, the immersion circulator removes guesswork and risk from the equation. It’s not just another gadget; it’s a paradigm shift that gives you, the home cook, the same level of control as a professional chocolatier, ensuring a perfect temper, every single time.
This guide will deconstruct the science behind why sous-vide is not just easier, but fundamentally safer and more reliable. We will explore the precise temperature staging required for perfect crystal formation, the techniques to ensure your process is free from contamination, and how this method extends to other delicate preparations like custards and infusions, turning your kitchen into a modernist laboratory.
This article breaks down the core scientific and practical principles that make sous-vide the superior method for handling delicate tasks like tempering chocolate and making custards. The following sections will guide you through each critical concept, from basic safety to advanced applications.
Summary: Mastering Chocolate and Custards with Sous-Vide Precision
- Why Does Sous-Vide Prevent Chocolate from Burning or Seizing?
- How to Infuse Vanilla into Cream in 2 Hours Using Sous-Vide?
- Vacuum Sealing vs. Displacement Method: Which Is Safer for Liquids?
- The Temperature Mistake That Melts the Fat but Doesn’t Dissolve the Sugar
- When to Use Mason Jars Instead of Bags for Pot de Crème?
- Why Must You Cool Chocolate to 27°C Before Reheating to 32°C?
- How to Pour Hot Milk into Yolks Without Scrambling Them?
- How to Temper Chocolate Without a Marble Slab in Under 15 Minutes?
Why Does Sous-Vide Prevent Chocolate from Burning or Seizing?
The primary reason sous-vide is the safest method for handling chocolate lies in one core principle: absolute temperature control. Unlike a microwave with its intense hot spots or a double boiler where steam can cause unpredictable temperature spikes, an immersion circulator maintains the water bath at a precise temperature with no more than a fraction of a degree’s variance. This thermal inertia is the ultimate safeguard against the two greatest enemies of chocolate: excessive heat and accidental moisture.
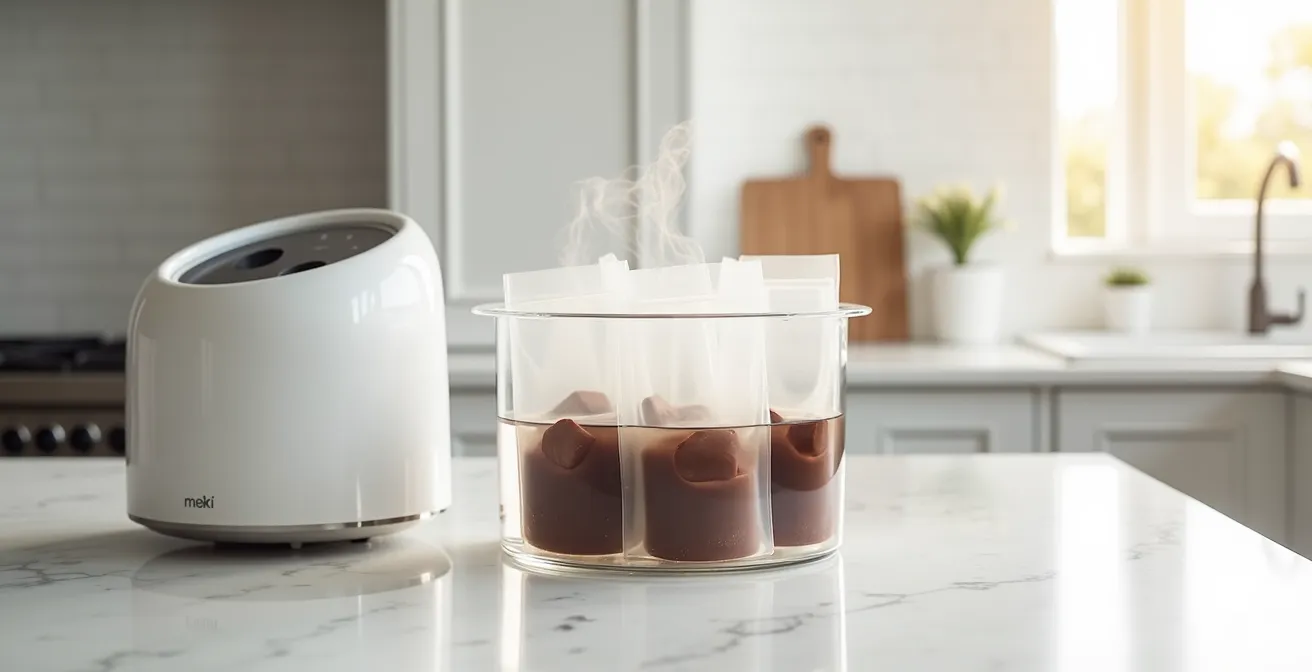
Burning, or scorching, happens when chocolate is exposed to temperatures far above its melting point. A sous-vide bath set to the target melting temperature will never exceed it, making it physically impossible to burn the chocolate. Seizing, on the other hand, is caused by moisture. The smallest drop of water can cause the sugar and cocoa particles to clump together, creating a gritty, paste-like texture. Since the chocolate is sealed in a waterproof bag, the risk of contamination from steam or a stray splash is completely eliminated, ensuring total process integrity.
The science of chocolate tempering is a game of crystallizing cocoa butter into its most stable form, known as Form V. This is an incredibly temperature-sensitive process. Research on crystal structures confirms that the desired Form V crystals melt at precisely 33.8°C, while the less stable forms melt at much lower temperatures. The ability of sous-vide to hold chocolate at, for example, 32°C indefinitely means you are keeping only the stable crystals intact, which is impossible with less precise methods.
This stability provides a significant practical advantage. As professional chocolatiers note, once your chocolate is tempered, you typically have a very short window to work with it. However, keeping the bag in the sous-vide bath allows you to extend this working time indefinitely. If you need to pause, you can simply return the chocolate to the water bath to maintain its perfect state without any risk of it falling out of temper, burning, or seizing.
How to Infuse Vanilla into Cream in 2 Hours Using Sous-Vide?
The same precision that makes sous-vide ideal for chocolate also makes it a powerful tool for creating infusions. Traditional stovetop methods for infusing flavors like vanilla into cream require constant monitoring to prevent scalding or boiling over. Sous-vide bypasses this entirely, allowing for a gentle, low-temperature extraction that captures delicate aromatic compounds without any risk of overcooking.
The process transforms a potentially fussy task into a simple, hands-off protocol. By sealing cream and vanilla beans in a bag and placing them in a precisely controlled water bath, you can extract deep, complex flavor over a period of hours. The temperature you choose dictates the final flavor profile. A lower temperature (around 63°C / 145°F) yields a bright, fresh vanilla flavor, while a higher temperature (around 85°C / 185°F) develops deeper, more ‘cooked’, and caramel-like notes, similar to a slow reduction. This level of control over the final product’s character is simply unattainable on a stovetop.
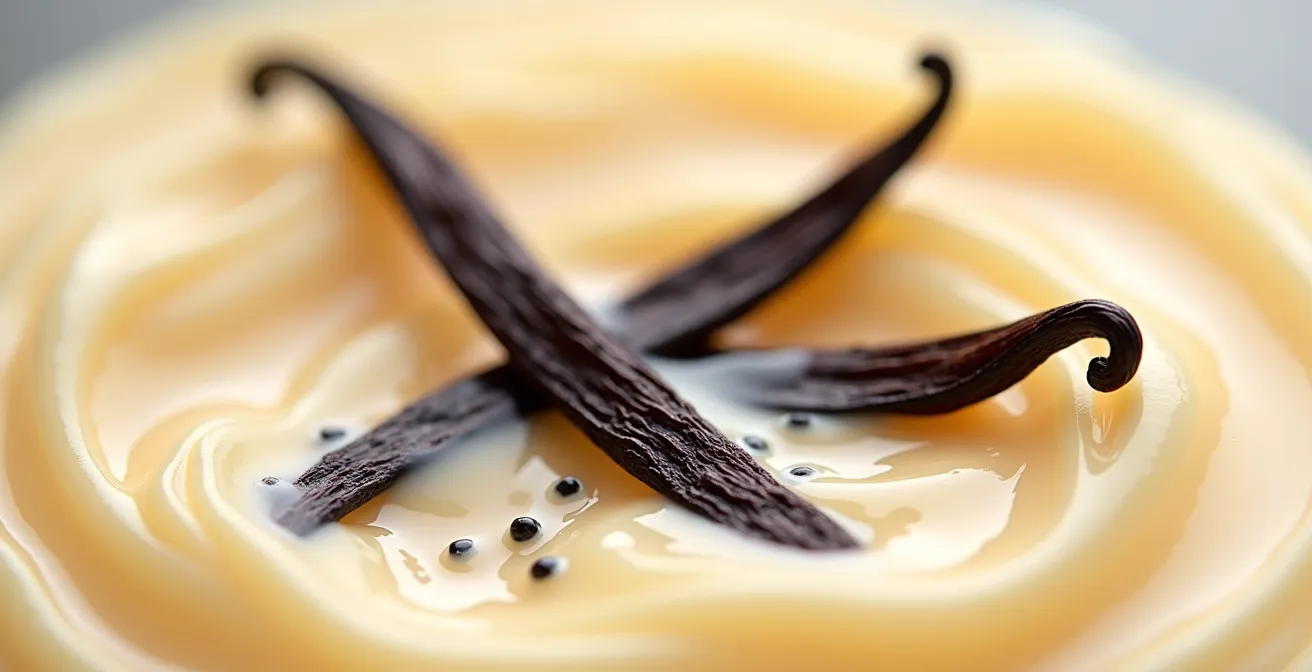
As the illustration shows, the process allows for a complete and thorough extraction, with the tiny vanilla seeds fully dispersing throughout the cream. After the infusion period, the bag is simply removed and chilled rapidly in an ice bath. This step is crucial as it locks in the volatile aromatic compounds that would otherwise be lost to evaporation in a traditional cooling process. The result is a cream with unparalleled depth and purity of flavor, ready to be used in ice cream bases, panna cotta, or crème brûlée.
To execute this, follow a simple temperature protocol:
- For a standard, bright vanilla flavor, set your immersion circulator to 145°F (62.8°C) and cook for 1 to 3 hours.
- For a deeper, more cooked flavor profile, increase the temperature to 185°F (85°C) for 1 to 5 hours.
- Always seal your cream and split vanilla beans in a vacuum bag, using the water displacement method to remove air.
- After the infusion is complete, strain the cream and immediately transfer it to an ice bath to chill quickly.
Vacuum Sealing vs. Displacement Method: Which Is Safer for Liquids?
While sous-vide eliminates many risks, the one remaining point of failure is at the seal. If water enters the bag, your chocolate or custard is ruined. Therefore, choosing the right sealing method is not a trivial detail; it’s central to ensuring process integrity. The two primary methods are using a chamber or edge vacuum sealer and the water displacement method.
For solid items like chocolate wafers or a thick, solid ganache, a vacuum sealer works perfectly. It removes all the air, ensuring maximum surface contact with the water for efficient heat transfer. However, for thin liquids like cream or melted chocolate, using an edge-type vacuum sealer is incredibly risky. The machine can easily suck the liquid up into its mechanism, creating a mess and, more importantly, a poor seal that is prone to leakage. Chamber vacuum sealers handle liquids better, but they represent a significant investment.
This is where the water displacement method becomes the safer and more practical choice for most home cooks. By slowly lowering a zip-top freezer bag containing the liquid into the water, the pressure of the water itself forces the air out. You can then seal the bag just above the waterline. It’s a simple, effective, and nearly foolproof way to remove air without any risk to your equipment. As the experts at Use Real Butter blog highlight, the last thing you want is a failure at this stage. They astutely observe:
The last thing you want is to temper your chocolate and then have to wrangle the bowl in the water bath and accidentally get water into your chocolate, causing it to seize.
– Use Real Butter Blog, Professional chocolate tempering guide
To provide a clear guide, this comparative table breaks down the best use cases and risks for each method, based on data from professional sous-vide resources. A third, hybrid method—partially freezing the liquid before vacuum sealing—offers the highest level of safety for all liquid types if you have the time.
| Method | Risk Level | Best For | Key Safety Tip |
|---|---|---|---|
| Vacuum Sealing | High for liquids | Thick ganache, solid chocolate | Water is the enemy of melted chocolate. The tiniest bit will make it seize, giving you grainy, ugly, useless chocolate—dry everything well! |
| Displacement | Lower for liquids | Thin liquids, cream | Be very careful when sealing the chocolate if using water immersion method. |
| Freeze & Vac | Lowest overall | All liquid types | Partially freeze liquid into slush before vacuum sealing for best results. |
The Temperature Mistake That Melts the Fat but Doesn’t Dissolve the Sugar
A common failure in traditional tempering is ending up with chocolate that looks dull, feels gritty, or has white streaks—a phenomenon known as “bloom.” This happens when the chocolate is melted, but not correctly tempered. The underlying issue is a failure to manage the cocoa butter’s crystal structure. Properly tempered chocolate relies exclusively on the formation of stable Form V beta crystals. Any other crystal type results in a poor texture and appearance.
The critical mistake is often one of improper temperature staging. You might melt the chocolate completely, dissolving all crystal forms, but then fail to cool it sufficiently to encourage the right crystals to form. According to detailed studies in publications like Pastry Arts Magazine, achieving the correct structure is a multi-step process. The science shows that primary nucleation requires cooling to a range of 25.5°C-27.7°C (78°F-82°F). This cooling phase is what encourages the initial formation of the desired Form V crystals. If you skip this step and just cool the chocolate slightly, you end up with a chaotic mix of unstable crystal forms.
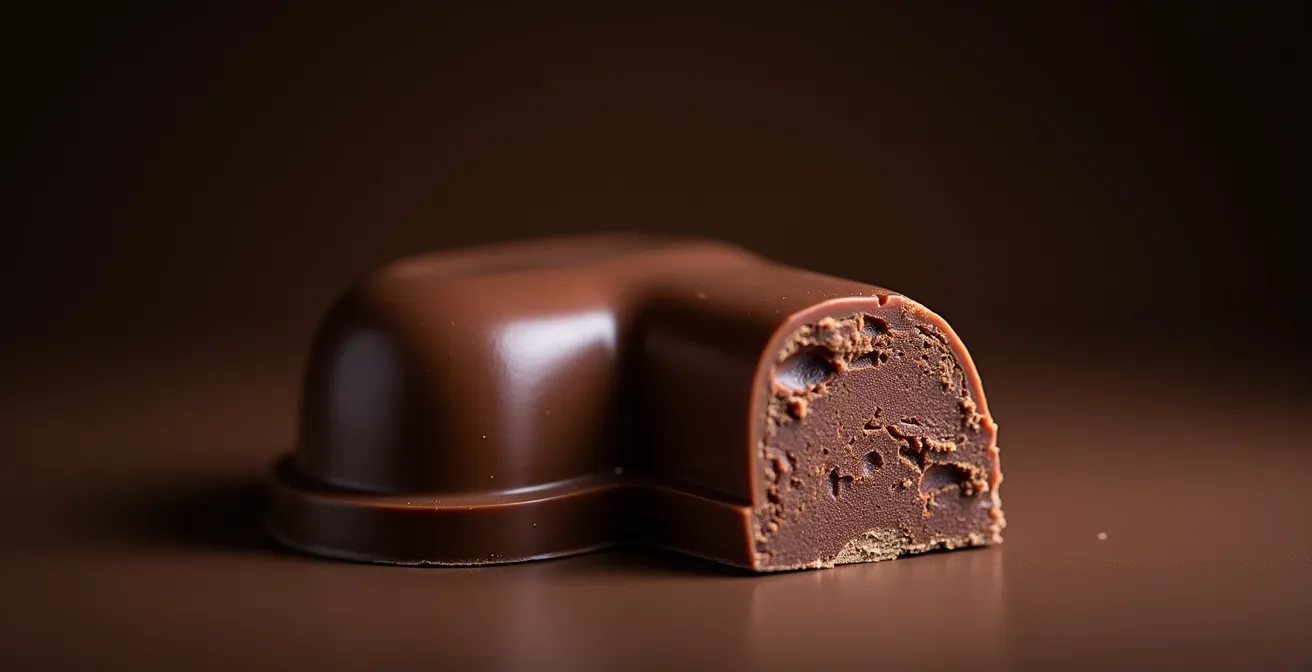
The visual difference is stark. As seen in the comparison, properly tempered chocolate (left) has a uniform, high-gloss surface and will snap cleanly. This is the hallmark of a well-formed, dense network of Form V crystals. Untempered chocolate (right) is dull, often has a whitish or streaky appearance from fat or sugar bloom, and has a soft, crumbly texture. This is the direct result of a chaotic crystal structure. Sous-vide makes it simple to execute the correct temperature staging perfectly every time, ensuring you always produce the structure on the left, not the one on the right.
The process is about creating “seed” crystals. By cooling the chocolate to the correct temperature, you create a batch of Form V crystals. When you then gently reheat the chocolate to its working temperature (around 32°C / 90°F), you melt away all the unstable crystal forms, leaving only the stable Form V seeds to multiply and structure the entire batch.
When to Use Mason Jars Instead of Bags for Pot de Crème?
While bags are perfect for tempering chocolate or infusing liquids, they are not ideal for preparations that need to be cooked and served in the same vessel, like individual custards, cheesecakes, or pots de crème. For these applications, small canning jars, such as 4-ounce Mason jars, are the superior tool. They offer a “cook-in, serve-in” solution that is not only elegant and efficient but also enhances the safety and longevity of the final product.
The technique is straightforward: the custard base is prepared and poured directly into the jars. The crucial step is to seal the lids only “finger tight.” This is a specific term meaning you tighten the lid just until you feel the first point of resistance, and then stop. This is vital because as the jars heat up in the water bath, the air inside needs to escape. If the lids are too tight, pressure can build up and crack the glass. As the jars cool after cooking, a vacuum forms, creating a perfect seal. This seal pasteurizes the contents, allowing them to be stored in the refrigerator for up to two weeks, a significant advantage over traditionally made custards.
The primary benefit, as with all sous-vide cooking, is the impossibility of overcooking. A custard is cooked when its egg proteins coagulate, typically around 82°C (179°F). If you set your water bath to that temperature, the custard can never get hotter, no matter how long you leave it in. This guarantees a perfectly smooth, silky texture every time, without any risk of the dreaded “scrambled egg” consistency that can happen in an oven.
Action Plan for Perfect Sous-Vide Custards
- Set temperature: Preheat your sous-vide bath to 179°F / 82°C. Never exceed 185°F / 85°C to prevent curdling.
- Jar preparation: Fill clean, cold jars only 3/4 full to allow for expansion during cooking and prevent spillage.
- Sealing: Secure the lids “finger tight” only. This allows air to vent during cooking and a vacuum to form during cooling.
- Cooking: Gently place the jars in the preheated water bath and cook for at least one hour, or as your recipe directs.
- Cooling and Storage: Carefully remove the hot jars and let them cool to room temperature before refrigerating. The vacuum seal allows for storage up to 2 weeks.
Why Must You Cool Chocolate to 27°C Before Reheating to 32°C?
The iconic temperature curve of chocolate tempering—melting high, cooling low, then reheating to a working temperature—is not arbitrary. It is a precise thermal protocol designed to manipulate the molecular structure of cocoa butter. The entire goal is to selectively cultivate one specific type of crystal, Form V, while eliminating all others. This specific cooling and reheating cycle is the mechanism that achieves this.
When you first melt chocolate (to around 45°C / 113°F), you are essentially wiping the slate clean by dissolving all existing cocoa butter crystals. As the melted chocolate cools, different crystal forms begin to appear at different temperatures. As detailed in in-depth analyses by experts like Chocolate Alchemy, if you let it cool slowly, a cascade of crystal types will form: first the stable Form V, but then the unstable Forms IV, III, II, and I as the temperature continues to drop. If you use the chocolate at this point, it will be a chaotic mix, resulting in a poor temper.
The critical step is cooling the chocolate down to approximately 27°C (81°F). This temperature is the sweet spot for creating a high concentration of Form V crystals. This batch of crystals acts as a “seed.” When you then gently reheat the chocolate to the working temperature of 32°C (90°F), you are performing a targeted melt. At this temperature, all the unstable crystal forms (I-IV) melt away, but the stable Form V crystals remain intact. The entire mass of melted cocoa butter will then preferentially crystallize around these remaining Form V seeds, leading to a finished product that is composed almost entirely of the stable crystals needed for a glossy finish and a clean snap.
Essentially, the process is:
- Melt: Erase all crystal structures.
- Cool (to 27°C): Create a new batch of “seed” crystals, primarily the desired Form V.
- Reheat (to 32°C): Melt away all unwanted, unstable crystals, leaving only the Form V seeds behind to structure the final product.
Sous-vide allows you to hit these three temperature targets with unparalleled accuracy, guaranteeing a perfect seed crystal structure every time.
How to Pour Hot Milk into Yolks Without Scrambling Them?
The classic technique for making a custard base—tempering—involves slowly whisking a stream of hot milk into egg yolks to gently raise their temperature without scrambling them. It’s a foundational skill, but one that is fraught with peril. Go too fast, and you have sweet scrambled eggs. Go too slow, and the base cools down too much. Sous-vide presents a radical and far superior solution: it eliminates the need for tempering entirely.
Instead of heating the liquid and eggs separately and combining them hot, the sous-vide protocol calls for combining all ingredients—yolks, milk, cream, sugar, salt—while they are still cold. The cold mixture is whisked together until homogenous and then sealed in a bag. The bag is then placed in a water bath preheated to the final target temperature, typically around 85°C (185°F). The mixture is then cooked for a set amount of time, usually an hour. During this time, the entire base is brought up to temperature so gently and uniformly that there is zero risk of the egg proteins curdling or scrambling. The result is a perfectly smooth, fully pasteurized custard base, every single time, with no active monitoring required.
This method leverages the unique properties of egg yolks, which are not just for flavor but are crucial for texture. As food science blogs dedicated to ice cream note, yolks are powerful emulsifiers.
Egg yolks play an essential role in sous vide ice cream, not just for their rich flavor but also for their ability to enhance texture and stability. Their emulsifying properties help stabilize the custard, preventing ice crystal formation and guaranteeing a smooth finish. Typically, a recipe calls for 6 large egg yolks, which are pasteurized at around 185°F (85°C).
– Ice Cream Hater Blog, Sous Vide Precision Cooking for Ice Cream
The sous-vide “all-in-one” method guarantees these emulsifying properties are perfectly preserved without any of the stress of traditional stovetop cooking. It is a game-changing technique for anyone making ice cream, crème anglaise, or any other custard-based dessert, freeing you from the stove and eliminating a major source of potential failure.
Key Takeaways
- Sous-vide provides absolute temperature control, making it physically impossible to scorch chocolate or overcook custards.
- The use of sealed bags or jars creates total process integrity, eliminating the risk of water contamination that causes chocolate to seize.
- Sous-vide enables precise temperature staging, which is essential for cultivating the stable Form V crystals required for a perfect chocolate temper.
How to Temper Chocolate Without a Marble Slab in Under 15 Minutes?
The image of a chocolatier gracefully working molten chocolate on a large marble slab is iconic, but it represents a method that is messy, requires significant space, and has a steep learning curve. For the home cook or gadget lover, sous-vide offers a method that is faster, cleaner, requires minimal equipment, and boasts a near-perfect success rate. It effectively replaces the need for a marble slab and constant attention with a hands-off, scientifically sound protocol.
The active time required for sous-vide tempering is remarkably short. It involves about five minutes of preparation—weighing the chocolate and sealing it in a bag. The rest of the time is completely hands-off as the immersion circulator does the work of precisely executing the melting, cooling, and reheating stages. This is a stark contrast to microwave or traditional seeding methods, which demand 15-30 minutes of constant stirring, temperature checking, and vigilance. As a result, the success rate skyrockets. While microwave tempering can be hit-or-miss, and even seeding has its failure points, the sous-vide method is often described as “fool-proof.”
As food blogger Baked Bree enthusiastically puts it:
Tempering chocolate using the sous vide method is fool-proof. Follow a few simple steps and you will have perfectly tempered chocolate Every. Single. Time. (Seriously, this is a game-changer.)
– Baked Bree, How to Temper Chocolate Using The Sous Vide Method
This dramatic improvement in reliability and efficiency is best understood through a direct comparison. The following table breaks down the key metrics for different tempering methods, illustrating exactly why sous-vide is the superior choice for the modern home kitchen. Not only is the success rate higher, but the ability to hold chocolate in temper indefinitely is a unique advantage that no other method can offer.
| Method | Active Time | Success Rate | Equipment Cost | Scalability |
|---|---|---|---|---|
| Sous Vide | 5 minutes prep + hands-off | 95%+ | $100-200 | Excellent |
| Microwave | 15 minutes constant attention | 60-70% | $50-100 | Poor |
| Seeding | 20-30 minutes | 75-85% | $20-50 | Moderate |
| If you have a sous vide machine, this is a fantastic tool for tempering chocolate and keeping it in temper while you work! You can hold it in temper indefinitely! | ||||
By embracing this method, you are not just making chocolate; you are executing a precise protocol that guarantees a superior outcome. The next logical step is to apply this mindset to your own kitchen and begin experimenting with the flawless results that sous-vide offers for all your temperature-sensitive creations.