The Art of Chocolate
Chocolate occupies a unique space in the culinary world, existing simultaneously as a beloved ingredient and a medium for artistic expression. The transformation from simple cocoa to stunning edible creation requires a harmonious blend of technical mastery, sensory understanding, and aesthetic vision. Whether you’re crafting a mirror-smooth glaze, building a gravity-defying centerpiece, or simply plating a dessert with intention, chocolate artistry demands both precision and creativity.
This intersection of science and art can feel intimidating at first, but understanding the fundamental principles makes the journey accessible to anyone willing to learn. From the physics of tempering to the psychology of visual perception, from developing your palate to finding your unique creative voice, the art of chocolate encompasses far more than following recipes. In this comprehensive exploration, we’ll break down the essential elements that elevate chocolate work from competent to captivating, providing you with the knowledge foundation to approach chocolate with confidence and artistry.
Why Aesthetics Transform the Chocolate Experience
The moment a chocolate creation appears before us, our brain begins processing information long before the first taste touches our tongue. Research in sensory science consistently demonstrates that visual presentation directly influences flavor perception, sometimes accounting for up to 30% of our taste experience. This isn’t superficial; it’s neurological reality that skilled chocolatiers leverage intentionally.
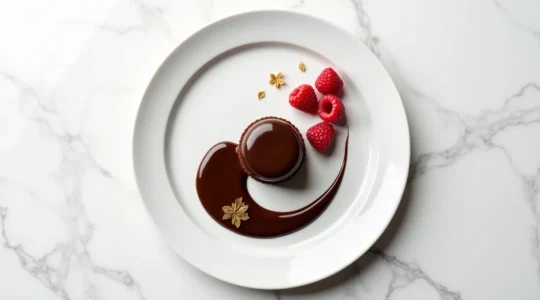
Visual contrast serves as one of the most powerful tools in your aesthetic arsenal. The interplay between glossy and matte surfaces, light and dark tones, or smooth and textured elements creates visual interest that literally stimulates appetite. Consider how a perfectly tempered dark chocolate square gains dramatic impact when placed against a bright white plate with a vibrant raspberry coulis—each element amplifies the others.
Professional plating techniques follow principles borrowed from fine art, particularly the rule of odds, which suggests that groupings of three or five elements create more visual harmony than even numbers. Height variation adds dynamism to otherwise flat presentations, guiding the eye through the composition. The negative space on a plate isn’t empty; it’s breathing room that allows each component to shine without visual clutter.
Common presentation mistakes often stem from overcrowding or lack of focal point. A beautifully crafted bonbon loses impact when surrounded by competing elements fighting for attention. The most memorable chocolate presentations typically feature intentional simplicity—a clear hierarchy where each element has purpose and placement follows deliberate logic rather than random arrangement.
Mastering Essential Chocolate Techniques
Technical proficiency forms the foundation upon which artistic expression builds. Without proper tempering, the most beautiful design crumbles into bloom and soft texture. Without understanding glaze physics, your mirror finish becomes streaked and dull. These techniques aren’t merely mechanical steps—they’re the language through which you’ll express your creative vision.
The Science of Glazing Perfection
Achieving that coveted mirror glaze requires understanding three critical factors: temperature precision, pouring technique, and condensation prevention. The ideal pouring temperature typically falls between 90-95°F (32-35°C), though this varies slightly depending on your glucose type and cocoa butter ratio. Too hot, and the glaze runs off completely; too cold, and it sets before achieving that seamless finish.
Condensation represents the silent enemy of chocolate glazing. When cold desserts meet room-temperature glaze, microscopic water droplets form instantly, creating those frustrating cloudy patches. Professional chocolatiers solve this by ensuring frozen desserts reach approximately 0-5°F (-18 to -15°C) before glazing, then working swiftly in a controlled environment.
Bubble removal requires both prevention and correction. Blending glaze gently rather than vigorously minimizes air incorporation, while a fine-mesh strainer catches bubbles before pouring. Leftover glaze needn’t go to waste—proper storage and gentle reheating (never microwaving directly) allows reuse for multiple projects, making this stunning technique more economical than many realize.
Working With Colored Cocoa Butter
Colored cocoa butter opens entirely new creative possibilities, transforming chocolate from monochromatic to kaleidoscopic. Understanding basic color theory becomes essential: complementary colors create vibrant contrast, while analogous colors produce sophisticated harmony. The key difference from traditional painting lies in the fat-based medium—water-based colors simply won’t adhere or blend properly.
Application techniques range from airbrush spraying for gradient effects to hand-painting for detailed designs. The cocoa butter must be warm enough to remain fluid (around 86-90°F/30-32°C) but not so hot that it melts the chocolate beneath. This delicate balance becomes intuitive with practice, though a simple heating pad or chocolate warming lamp helps maintain consistent temperature during detailed work.
Developing Your Palate: The Foundation of Flavor Mastery
Visual artistry means little if the flavor disappoints. Developing a refined palate for chocolate requires intentional practice and systematic methodology. Professional tasters approach chocolate evaluation with the same rigor sommeliers apply to wine, recognizing that flavor intensity, roasting impact, and tasting notes each contribute distinct information.
A proper tasting methodology involves multiple stages. First, observe appearance and snap—quality tempered chocolate should break with a clean crack. Next, allow a small piece to melt slowly on your tongue rather than chewing immediately. This reveals the initial flavor notes (often fruity or floral), the development (where nutty or caramel notes emerge), and the finish (which might bring earthy, bitter, or lingering sweet notes).
Dark chocolate intensity levels range dramatically, from 50% cacao content (sweet and approachable) to 85%+ (intensely bitter and complex). Choosing appropriate intensity depends on context—what works beautifully as a standalone tasting experience might overwhelm when paired with delicate flavors. Understanding roasting impact helps predict these profiles; lighter roasts preserve fruity, acidic notes while darker roasts develop robust, sometimes smoky characteristics.
Palate fatigue presents a real challenge when tasting multiple chocolates. Professional strategies include:
- Cleansing with room-temperature water and plain crackers between samples
- Tasting from lightest to darkest intensity to avoid overwhelming delicate flavors
- Limiting sessions to 5-7 samples to maintain sensory accuracy
- Scheduling tastings when alert and not hungry (extreme hunger or fullness both distort perception)
Optimizing pairings requires considering both complementary and contrasting approaches. Salt heightens chocolate’s sweetness through contrast, while coffee or nuts complement its inherent flavors. Acidic fruits like raspberry cut through richness, creating balance in compositions that might otherwise feel heavy.
Creating Structural Chocolate Showpieces
The leap from plated desserts to freestanding chocolate sculpture represents both technical challenge and creative liberation. Show-stopping centerpieces demand understanding of structural physics, assembly techniques, and practical logistics that differ significantly from standard chocolate work.
The physics of balance in chocolate sculpture follows the same principles as architecture—center of gravity must fall within the base of support. This explains why successful tall pieces often feature wider bases or strategic internal support structures. Tempered chocolate provides strength, but even perfectly tempered chocolate has limits; pieces thicker than 3-4mm offer significantly more structural integrity than delicate thin sections.
Chocolate “glue” methodology typically employs one of two approaches: using slightly melted tempered chocolate as adhesive (which maintains hardness but requires perfect temperature timing) or creating a thicker paste from chocolate and minimal cocoa butter (which offers more working time but slightly different finish). The joint must be clean and dry—even microscopic moisture prevents proper adhesion.
Transport risks multiply with structural complexity. Temperature fluctuations, vibration, and simple momentum all threaten chocolate architecture. Professional strategies include:
- Building pieces in sections that assemble on-site rather than transporting fully assembled
- Climate-controlled transport maintaining 65-70°F (18-21°C) consistently
- Strategic internal supports (wooden dowels, acetate, even 3D-printed armatures)
- Careful theme selection that allows for modular, robust design rather than precarious extensions
Display conditions make or break chocolate showpieces. Lighting generates heat, so LED fixtures positioned strategically to illuminate without warming work best. Air conditioning prevents melting, but too-cold environments risk condensation when pieces are moved. The sweet spot typically sits around 65-68°F (18-20°C) with moderate, stable humidity.
Finding Your Artistic Voice in Chocolate
Technical mastery provides vocabulary, but artistic voice requires something more personal—the courage to make deliberate choices that reflect your unique perspective. This journey involves balancing tradition and innovation while developing efficient creative workflows that sustain rather than drain your energy.
Every chocolatier stands on the shoulders of centuries of tradition. Classical techniques like hand-dipping truffles or creating pulled sugar decorations carry wisdom refined through generations. Innovation doesn’t require rejecting these foundations; rather, it asks what happens when you apply traditional technique to unexpected contexts or combine classical elements in novel ways. Perhaps you maintain traditional ganache recipes but present them with contemporary minimalist plating, or use centuries-old spice combinations with modern texturing techniques.
Developing a unique artistic voice begins with exposure and experimentation. Study diverse chocolate traditions—French, Belgian, Swiss, Latin American—to understand different aesthetic philosophies. Then experiment systematically: change one variable at a time, document results, and notice what excites you. Your distinctive style will emerge from the intersection of what you love creating and what you execute exceptionally well.
Optimizing creative workflow prevents burnout and maintains consistency. Professional chocolatiers often batch similar tasks together (all tempering at once, all molding together) to maintain focus and efficiency. They also build in time for play—experimental sessions without client pressure where mistakes become learning rather than failures. This balance between disciplined production and creative exploration sustains long-term artistic growth.
Chocolate artistry represents a lifelong journey where technical precision and creative expression intertwine inseparably. The tempering curve you’ve mastered becomes the foundation for your glossiest glaze; your trained palate informs which flavors to pair in that sculptural centerpiece; your understanding of visual principles guides every plating decision. As you develop these skills progressively, you’ll find that chocolate transforms from ingredient into medium—a way to communicate beauty, emotion, and craftsmanship that resonates far beyond simple taste. Start with whichever aspect calls to you most strongly, whether that’s perfecting your glazing technique or training your palate, knowing that each element you master enriches all the others.
The Art Director’s Secret: Why Negative Space Is Your Most Powerful Plating Tool
Contrary to popular belief, achieving an expensive, Michelin-level look isn’t about complex garnishes, but about the strategic use of empty space on the plate. Negative space directs the diner’s gaze, creating a focal point and a clear narrative for the…
Read more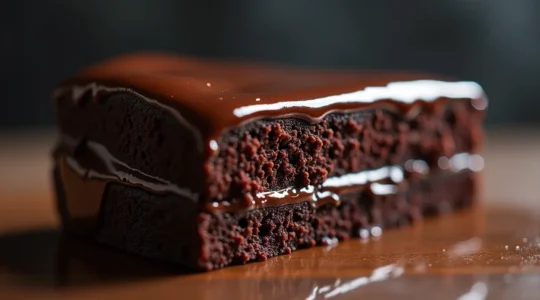
Why Does Your Ganache Glaze Lose Its Shine After 24 Hours in the Fridge?
Contrary to common belief, a lost shine is rarely due to a single mistake but is a failure in controlling the glaze’s molecular stability throughout its entire lifecycle. Sugar bloom and dullness are caused by moisture migration (water activity), not…
Read more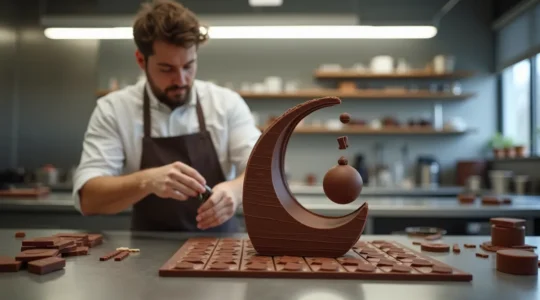
How to Build a Gravity-Defying Chocolate Sculpture for Beginners?
Building a stable chocolate sculpture is less about artistic flair and more about mastering structural engineering. The primary cause of collapse is not poor design, but a failure to control the chocolate’s crystalline structure and the ambient temperature. Advanced techniques…
Read more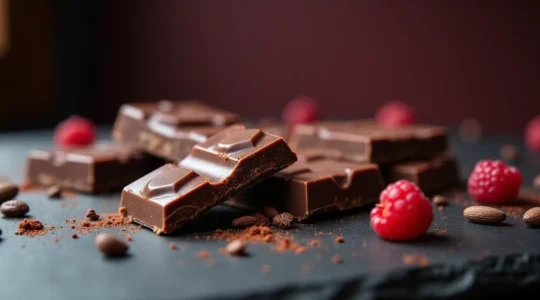
How to Train Your Palate to Detect Red Fruit Notes in 70% Chocolate
Detecting fruit notes in dark chocolate is not a gift, but a trainable skill of decoding sensory signals your brain currently mislabels as “bitter.” Bitterness often masks flavor due to palate fatigue or excessively high cacao percentages that overwhelm your…
Read more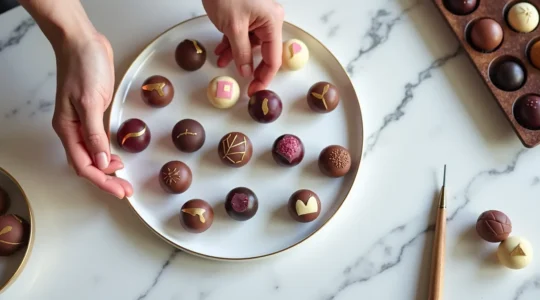
How to Design Signature Bonbons That Stand Out on Instagram?
The common belief is that beautiful chocolates are about technical skill; the truth is, standout bonbons are born from brand strategy, not just craft. Your collection needs a “Collection Narrative”—a core story that dictates every choice of color, shape, and…
Read more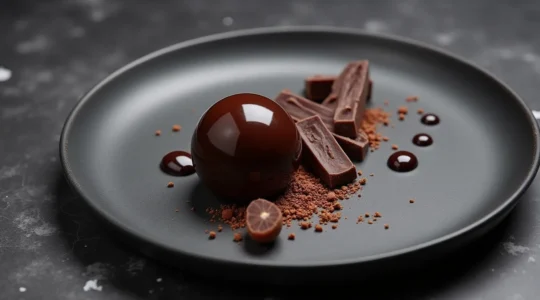
How to Transform Simple Chocolate Desserts into 3-Star Michelin Plates?
The leap from good to great in dessert presentation lies not in complex skills, but in mastering the psychology of visual design. Compositional rules, like using an odd number of elements, create dynamic visual tension that engages the eye. Strategic…
Read more