In summary:
- Deflated éclairs are a structural failure, not a flavor one. The goal is to build a self-supporting shell.
- Drying the dough on the stove (creating the ‘panade’) is crucial for starch gelatinization, which traps the steam needed for inflation.
- High-protein bread flour provides a stronger protein framework (scaffolding) to hold the shape during and after baking.
- Never open the oven during the initial high-heat phase (first 20-25 minutes); the sudden temperature drop causes steam to condense and the structure to collapse.
- The final shell must be completely dehydrated to be self-supporting; a hollow sound when tapped is the key indicator of doneness.
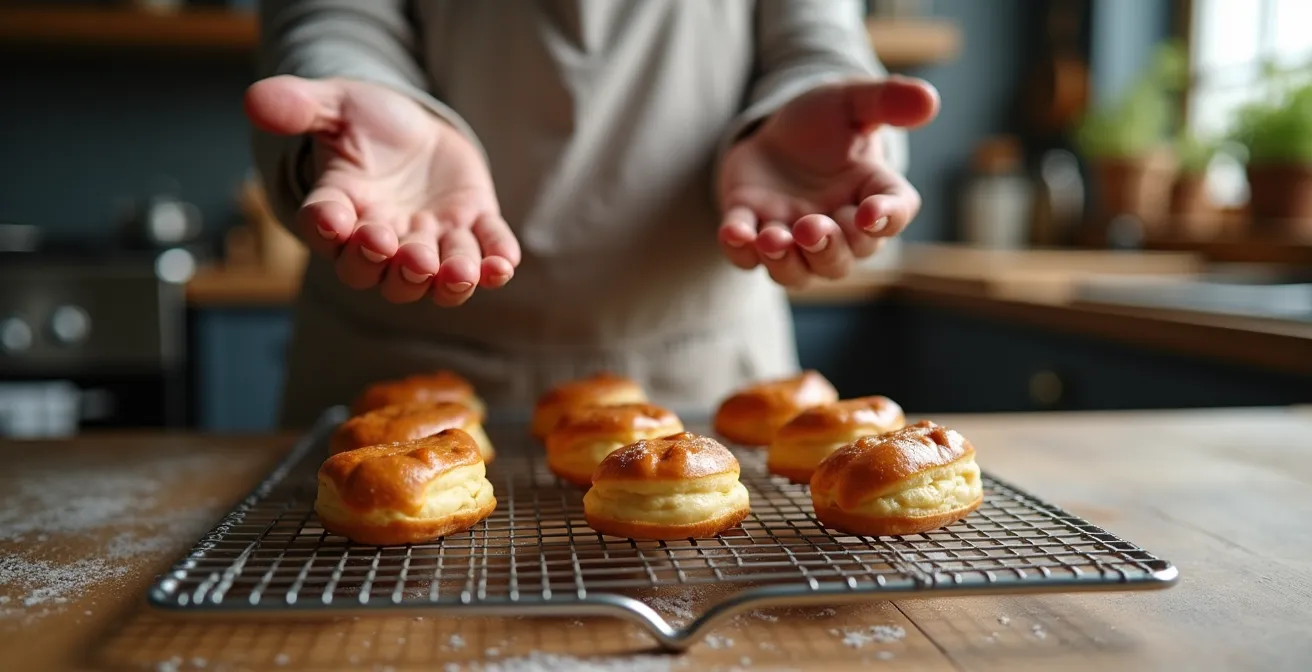
There is no greater heartbreak for an aspiring pastry chef than watching perfectly puffed, golden éclairs deflate into sad, wrinkled puddles the moment they leave the oven. You followed the recipe to the letter, resisted the urge to peek, and yet the result is a flat, soggy shell instead of a crisp, hollow vessel. The common advice—”bake them longer” or “make sure your dough is stiff”—is often too vague to be truly helpful, leaving you with more questions than answers.
But what if the problem isn’t your recipe, but your engineering? The key to a perfect éclair lies in understanding it not as a delicate pastry, but as a feat of structural engineering powered by steam. Deflation is a symptom of a weak foundation. To fix it, you must stop thinking like a baker who just follows steps and start thinking like a structural troubleshooter who understands the physics of steam pressure, the chemistry of starch gelatinization, and the architecture of protein coagulation.
This guide will deconstruct the entire process from a structural standpoint. We will analyze the critical role of water evaporation, the choice of building materials (flour), the precise heat application required for a powerful “oven spring,” and the drying process that ultimately determines whether your structure stands tall or collapses. By mastering these principles, you will gain the ability to diagnose and prevent deflation, building perfect, hollow éclair shells with confidence and consistency.
To navigate this deep dive into the architecture of choux pastry, here is a breakdown of the key structural checkpoints we will cover. Each section builds upon the last, providing a complete blueprint for success.
Summary: The Structural Engineer’s Guide to Deflation-Proof Éclairs
- Why Is Water Evaporation Critical for the Rise of Choux?
- How to Pipe Uniform Eclairs Without Special Moulds?
- Bread Flour vs. Cake Flour: Which Holds the Eclair Shape Better?
- The ‘Peeking’ Mistake That Collapses Your Shells in Seconds
- How Much Cream Can You Fill Before the Eclair Bursts?
- Why Must You Dry the Dough in the Pot Before Adding Eggs?
- Why Must You Boil the Cream for 1 Minute to Neutralize Starch Taste?
- How to Know When Choux Pastry Is Dry Enough Inside Without Cutting It Open?
Why Is Water Evaporation Critical for the Rise of Choux?
The magnificent puff of a choux pastry shell is not caused by chemical leaveners like baking powder or yeast; it is a purely physical phenomenon driven by steam pressure dynamics. The water within the dough is the sole leavening agent. When the éclair hits the hot oven, that water rapidly turns into steam. This steam expands dramatically and pushes outwards, inflating the dough like a balloon. For this to happen, the structure must be capable of first trapping the water and then stretching without breaking.
This is where the initial cooking of the dough on the stove—the ‘panade’ stage—becomes the most critical step in the entire process. Heating the flour and water mixture accomplishes one vital task: starch gelatinization. As the mixture heats up, the starch granules in the flour absorb water and swell, forming a thick, glue-like paste. This gelatinized starch creates a waterproof matrix that effectively traps water molecules within the dough, ensuring they are available later to become steam.
The Science of Starch Gelatinization in Choux
An extensive analysis by Kitchen Projects revealed that the optimal temperature for starch gelatinization is crucial for trapping hydration. The pre-cooked flour binds water molecules, which are then converted to a powerful burst of steam during baking. This process also denatures the gluten, allowing it to expand without the usual elastic resistance. This lets the steam inflate the pastry until the heat is high enough to set the shell’s final structure, creating the coveted hollow interior.
Without proper gelatinization, water will leak out of the dough during baking instead of turning into pressurized steam. This results in a weak, insufficient lift and a dense, wet interior. Therefore, mastering the initial cooking of the panade is the first and most fundamental step in building the potential for a powerful, structurally sound rise.
How to Pipe Uniform Eclairs Without Special Moulds?
Achieving a professional-looking batch of éclairs starts with consistent piping. Uniformity is not just for aesthetics; it is essential for even baking. An éclair with a thick middle and thin ends will bake unevenly, with the ends becoming dry and brittle before the center is structurally sound. This inconsistency creates weak points that are prone to collapse. The goal is to pipe logs of dough with a consistent diameter from end to end. The ridges created by a star-shaped piping tip are also structurally important, as they create thin lines that expand more easily, guiding the puff upwards in a controlled manner.
Securing the parchment paper to the baking sheet with small dabs of choux paste in the corners is a simple but vital professional trick. This prevents the paper from sliding as you pipe, which is a common cause of misshapen éclairs. Holding the piping bag at a consistent 45° angle gives you optimal control over the flow and direction of the dough. The real key, however, is applying steady, even pressure while moving your hand at a constant speed.
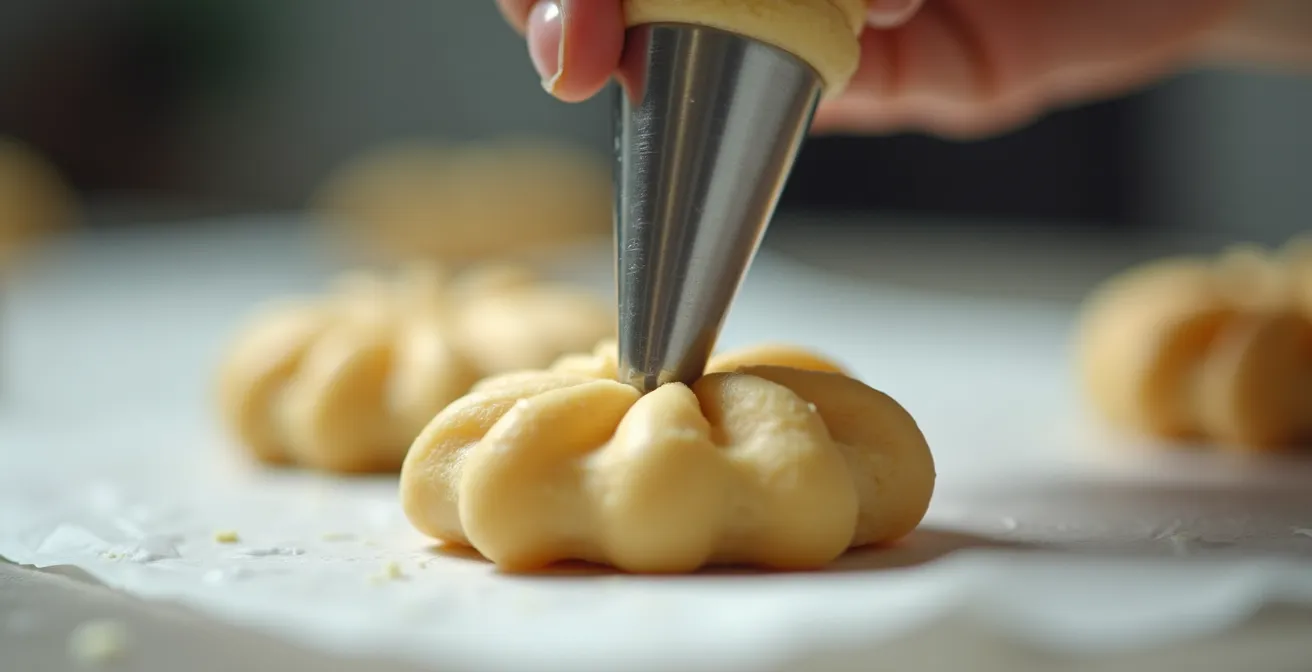
As seen in the technique above, the perfect motion is smooth and deliberate. To finish a line cleanly, stop squeezing the bag a split second before you stop moving, then flick your wrist backwards to break the connection. This prevents the dreaded “tail” or blob at the end of the éclair. Drawing guide lines on the underside of your parchment paper is an excellent way to practice and ensure every éclair is the same length, leading to a uniformly baked and structurally stable batch.
Action Plan: Professional Piping Technique
- Draw 4-inch guide lines on parchment paper, then flip the paper over to avoid any ink contact with the dough.
- Secure the parchment to your baking sheet with small dots of choux paste at the corners to prevent it from sliding.
- Hold the piping bag at a 45° angle with a star tip attached to create controlled ridges for even expansion.
- Remove all air bubbles by flattening the filled bag and pushing the choux paste firmly toward the tip before you start.
- Apply steady, even pressure while moving at a consistent speed along your guide marks.
- Stop applying pressure just before lifting the tip, then perform a quick backward flick of the wrist to break the connection cleanly.
Bread Flour vs. Cake Flour: Which Holds the Eclair Shape Better?
If the gelatinized starch is the mortar of your éclair’s structure, then the protein in the flour is the brick and scaffolding. The choice of flour directly impacts the structural integrity of the final shell. Flours differ primarily in their protein content; higher protein content means more gluten can be formed, resulting in a stronger, more resilient structure. For choux pastry, which needs to expand dramatically and then hold its shape, a stronger structure is almost always better.
Bread flour, with its high protein content (12-14%), creates the strongest gluten network. This robust scaffolding provides the necessary strength to contain the immense steam pressure during baking without rupturing. It also helps the shell maintain its inflated shape after baking, significantly reducing the risk of collapse. While some fear it may lead to a tough or chewy texture, in a properly made and dried choux, the result is a sturdy, crisp shell—not a heavy one. Conversely, cake flour has a very low protein content (7-9%), which creates a weak, delicate structure that is highly prone to collapsing and cracking.
This comparative analysis shows the direct relationship between protein content and structural performance in éclairs.
| Flour Type | Protein Content | Structure Strength | Final Texture | Collapse Risk |
|---|---|---|---|---|
| Bread Flour | 12-14% | Strongest | Sturdy, slightly chewy | Lowest |
| All-Purpose | 10-12% | Moderate | Balanced, tender | Medium |
| Cake Flour | 7-9% | Weakest | Very light, fragile | Highest |
| 80/20 Bread/Cake Blend | 11-12% | Customizable | Strong yet tender | Low |
All-purpose flour is a common compromise, but for those struggling with deflation, switching to bread flour is the single most effective ingredient change you can make. As noted by baking experts, the choice is clear when structural stability is the primary goal. As Chef Iso explains in his definitive guide on the topic:
Using a high-gluten flour will make the choux rise more evenly because it will better hold its structure. You can use all-purpose flour, but you will likely get more cracks.
– Chef Iso, Master Choux Pastry Guide
The ‘Peeking’ Mistake That Collapses Your Shells in Seconds
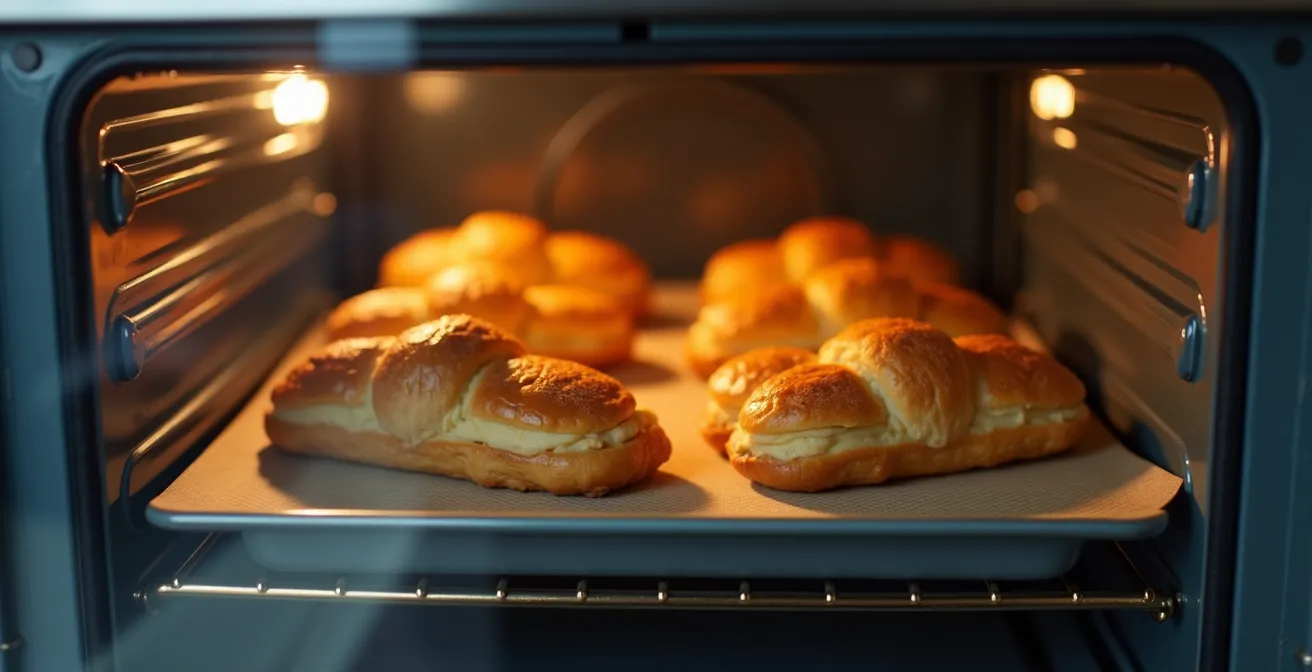
The warning “do not open the oven door” is the most repeated piece of choux pastry advice for a reason: it is a catastrophic, unrecoverable error. Opening the door during the initial, critical phase of baking causes a sudden, dramatic drop in oven temperature. This temperature shock has a devastating effect on the still-fragile, steam-filled structure of the éclairs. The steam inside, which was holding the walls of the pastry up, rapidly condenses back into water, creating a vacuum effect that implodes the shell instantly.
The first stage of baking is all about a powerful “oven spring,” driven by intense heat. Many professional recipes call for starting the bake at a very high temperature before reducing it. This initial blast of heat acts like jet fuel, converting the water in the dough into steam as quickly as possible for a maximum, rapid rise. According to La Cuisine Paris, it is imperative to keep the door shut during the first 20-25 minutes of baking, as this is when the structure is being inflated and is at its most vulnerable. Until the proteins and starches have cooked and set into a rigid shell, the éclair relies entirely on internal steam pressure to stay inflated.
Temperature Drop Impact on Éclair Structure
In-depth testing from ThermoWorks demonstrated that starting éclairs at 375°F (191°C) for 15 minutes provides the ‘jet fuel’ for initial puffing. Their experiments showed that opening the door during this phase causes an immediate temperature drop and steam condensation, leading to total collapse. Their recommended solution is to bake for the first 15 minutes at 375°F without opening, then reduce the heat to 350°F and continue baking until the shells are a deep golden brown and structurally set.
Resist the temptation to check on them. Trust your oven light and the timer. The structure is only self-supporting once it has fully browned and dried out. Opening the door even a crack before this point is like pulling the scaffolding out from under a building before the concrete has cured.
How Much Cream Can You Fill Before the Eclair Bursts?
Once you’ve successfully baked a batch of hollow, structurally sound shells, the next challenge is filling them completely without causing them to burst. An under-filled éclair is a disappointing experience, but an over-filled one can rupture the delicate shell. The key is to maximize the filling while respecting the structural limits of the pastry. A single hole at one end is often insufficient, creating an air pocket at the other end. The professional standard is the three-hole method, which ensures the cream is distributed evenly throughout the entire cavity.
By poking a hole at each end and one in the center of the bottom, you can fill from multiple directions. Start at one end, fill until you feel slight resistance, then move to the center hole to fill the main cavity, and finally top it off from the other end. This technique systematically displaces all the air, resulting in a shell that is generously filled from tip to tip. It is also important to use a pastry cream that is thick and fully chilled. A warm or runny cream exerts more hydraulic pressure on the inside of the shell, making it far more likely to split or burst during filling.
Beyond technique, experienced bakers develop a feel for a properly filled éclair. This tactile feedback becomes an invaluable tool in the kitchen, as professional baker Sophie Bamford explains:
A properly filled éclair should feel surprisingly heavy and substantial in your hand. An under-filled one feels light and hollow.
– Sophie Bamford
This “weight test” is the final confirmation that you’ve achieved a perfect fill. The goal is a dense, satisfying pastry where every bite is a perfect ratio of crisp shell to luscious cream. Mastering this filling technique is the final step in honoring the hard work of building a perfect shell.
Action Plan: The Three-Hole Filling Method
- Use a chopstick or the back of a small spoon to poke a hole at each end of the cooled éclair shell.
- Create a third hole in the center of the bottom of the shell.
- Insert your piping tip (with a 1/4-inch opening) into the first end hole.
- Squeeze gently until you feel resistance or see a small amount of cream emerge from the center hole.
- Move the piping tip to the center hole and continue filling until the éclair feels noticeably heavier.
- Finish by topping off from the opposite end hole to ensure the entire cavity is filled.
- Carefully wipe away any excess cream from the holes before glazing for a clean, professional finish.
Why Must You Dry the Dough in the Pot Before Adding Eggs?
The stage of cooking the flour, water, and butter mixture on the stove—forming the ‘panade’—is not just about combining ingredients. Its primary structural purpose is to cook the flour and control the dough’s moisture content. As you stir the mixture over the heat, you are actively causing two crucial things to happen: starch gelatinization and water evaporation. As we’ve discussed, gelatinization is what enables the dough to trap steam later on. Food science confirms that starch granules gelatinize irreversibly at 62-72°C (144-162°F), transforming the raw flour into a cooked, water-trapping matrix.
Simultaneously, you are evaporating excess water from the dough. This drying step is critical. A panade that is too wet will result in a final choux paste that is too loose and runny, even after adding the eggs. This overly-hydrated dough won’t have the stiffness required to hold its shape during piping or the initial stages of baking. It will spread out on the baking sheet, leading to flat, rather than tall, éclairs. The goal is to cook the panade until it pulls away from the sides of the pot and a thin film forms on the bottom. This is the visual cue that enough water has evaporated and the starches are fully gelatinized.
Only after the panade has been properly cooked and dried should you transfer it to a mixer to cool slightly before adding the eggs. Adding eggs to a screaming-hot panade will cook them, resulting in a grainy, lumpy texture. Cooling the panade to below the egg-cooking temperature ensures they incorporate smoothly, creating the silky, pipeable consistency of a perfect choux paste. Getting this initial stage right sets the foundation for everything that follows.
Why Must You Boil the Cream for 1 Minute to Neutralize Starch Taste?
A perfect pastry cream (crème pâtissière) should be thick, smooth, and luscious, with a clean vanilla flavor. Many recipes instruct you to boil the cream after adding the tempered eggs, but few explain the critical science behind this step. The common assumption is that boiling is necessary to cook out the “raw” taste of the cornstarch. While this is partially true, the primary reason is far more important from a structural perspective: you must destroy a rogue enzyme.
Cornstarch naturally contains an enzyme called amylase. If this enzyme is not denatured (destroyed) by heat, it will remain active in your finished pastry cream. Over the course of a few hours, even in the refrigerator, the amylase will begin to break down the very starch molecules that are responsible for thickening the cream. The result? A beautifully thick pastry cream that mysteriously turns into a watery, soupy mess, unfit for filling éclairs. This enzymatic breakdown is a common source of frustration for bakers who can’t figure out why their once-perfect cream has failed.
As culinary science experts point out, this is a chemical certainty, not a baking variable.
The main goal isn’t just taste; it’s to destroy an enzyme. Cornstarch contains amylase, an enzyme that, if not denatured by boiling, will break down the starch and turn your thick pastry cream into a watery soup after a few hours.
– Martin Lippo (via implied culinary science), Professional Pastry Techniques
To prevent this, you must bring the pastry cream to a full, rolling boil while whisking constantly and hold it there for a full 60 seconds. This duration at boiling temperature is sufficient to permanently denature the amylase, ensuring your cream remains thick and stable. Don’t fear the boil; it is the only way to guarantee the structural integrity of your filling.
Key Takeaways
- An éclair’s structure depends on a strong, gelatinized starch matrix to trap steam for leavening.
- High-protein bread flour provides the necessary gluten scaffolding to prevent collapse during and after baking.
- The initial high-heat baking phase is critical; opening the oven door causes irreversible collapse due to steam condensation.
How to Know When Choux Pastry Is Dry Enough Inside Without Cutting It Open?
The final, crucial factor in preventing post-oven collapse is ensuring the éclair shell is completely dry and structurally rigid before it is removed from the heat. A shell that is beautifully golden on the outside but still contains moisture on the inside will inevitably deflate as it cools. The internal moisture softens the structure from within, causing it to weaken and sink. The goal is complete dehydration, transforming the soft, expanded dough into a crisp, self-supporting shell. Visually, this means the color should be a deep, uniform golden-brown, not just on the surface but deep within the cracks and crevices.
Professionals rely on a combination of sensory cues to determine doneness, as cutting one open is not a practical option. A key quantifiable metric is weight loss; rigorous testing has shown that perfectly baked éclairs lose 40-50% of their initial weight through water evaporation. While weighing them mid-bake is impractical, this highlights the sheer amount of moisture that must be driven out. A more practical method is the auditory test.
The Auditory Tap Test for Doneness
Professional bakers often use the ‘ping-pong ball test.’ Carefully pick up a hot éclair with tongs and tap the bottom firmly with your finger. A properly dried-out éclair will feel feather-light and produce a distinctly hollow sound, much like tapping a ping-pong ball. If you hear a dull thud, it indicates that moisture is still trapped inside and the éclair needs more time in the oven. The non-negotiable final step for guaranteed crispness is to turn the oven off, crack the door open with a wooden spoon, and leave the éclairs inside for at least 30-60 minutes to allow for complete, gentle dehydration in the cooling oven.
This final drying period is your ultimate insurance against collapse. It allows the last vestiges of internal steam to escape slowly without shocking the structure, resulting in a perfectly crisp, stable shell that will hold its shape for hours.
Audit Checklist for Structural Integrity
- Panade Quality: Did the dough form a single ball that pulled away from the sides of the pot, leaving a thin film on the bottom?
- Piping Uniformity: Are all piped éclairs of a consistent diameter and length, with clear ridges from a star tip?
- Color Check: Is the baked shell a deep, even golden-brown, including inside the cracks, not just on the smooth surfaces?
- The Auditory Test: Does tapping the bottom of a baked shell produce a sharp, hollow sound, or a soft, dull thud?
- Post-Bake Dehydration: Have the éclairs been left in a turned-off, cracked-open oven for at least 30 minutes to fully dry out?
By applying these structural engineering principles to your baking, you transform the process from one of hopeful guesswork to one of controlled execution. You now have the diagnostic tools to understand why failures happen and the technical knowledge to build a perfect, hollow, and gloriously stable éclair shell every single time.