The primary cause of rubbery pastry cream is starch retrogradation, a process triggered by improper cooking and cooling, not simply the amount of thickener used.
- Complete starch gelatinization requires boiling the cream for at least one full minute to create a stable, heat-resistant structure.
- Rapid cooling via an ice bath immediately after cooking is essential to halt the cooking process and minimize the formation of a rigid, rubbery gel network.
Recommendation: Focus on mastering the thermal process—boiling duration and cooling speed—to achieve absolute textural control and a consistently silky, never rubbery, result.
There is a unique frustration reserved for the dedicated dessert maker: spending time and care to create a beautiful crème pâtissière, only to pull it from the refrigerator and find a firm, rubbery block. It slices like a gelatin mold, lacks the desired silky mouthfeel, and betrays all the effort invested. You followed the recipe, you whisked until your arm ached, and yet the texture is a complete disappointment. This common failure leads many to simply blame the recipe or the type of starch used, often without understanding the true culprit.
The conventional wisdom is to simply “cook until thick” and “use cornstarch for a glossy finish.” While not incorrect, this advice is dangerously incomplete. It overlooks the intricate chemistry at play. The transformation of a liquid into a sublime, spoon-coating custard is a delicate dance of protein coagulation and starch gelatinization. Without a deeper understanding of these processes, you are merely hoping for the best rather than engineering a specific outcome. The secret to a perfect pastry cream isn’t in a magic ingredient, but in mastering the science of texture.
This guide moves beyond generic instructions. We will deconstruct the “why” behind each critical step, giving you the knowledge to take full command of the final texture. Instead of treating your pastry cream as a mystery, you will learn to see it as a system you can control at a molecular level. This is not just a recipe; it is a masterclass in textural refinement, designed to eliminate the risk of rubbery fillings forever.
By dissecting the critical moments—from tempering yolks without scrambling them to the final cooling phase—we will build a framework of principles. You will understand how to achieve a stable, heat-resistant, and flawlessly smooth filling that holds its shape beautifully without ever becoming stiff or unappealing.
Summary: Mastering the Science of Pastry Cream Texture
- Why Must You Boil the Cream for 1 Minute to Neutralize Starch Taste?
- How to Pour Hot Milk into Yolks Without Scrambling Them?
- Cornstarch vs. Flour: Which Gives a Glossier Finish?
- The Plastic Wrap Mistake That Forms a Skin on Your Custard
- When to Remove Vanilla Pods to Prevent Bitter Aftertaste?
- When to Add Spices: During Melting or Tempering for Better Release?
- How to Infuse Vanilla into Cream in 2 Hours Using Sous-Vide?
- Why Do Your Éclairs Deflate Immediately After Taking Them Out of the Oven?
Why Must You Boil the Cream for 1 Minute to Neutralize Starch Taste?
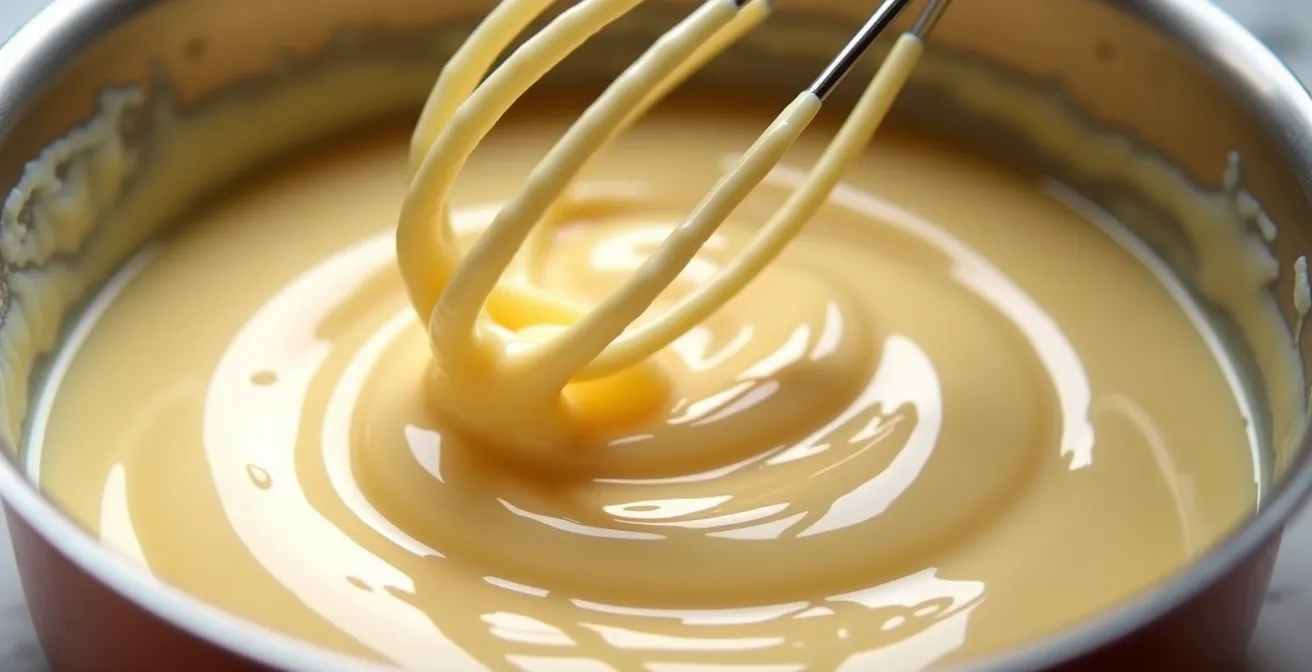
The most common misconception about pastry cream is that you should remove it from the heat the moment it thickens. This is a critical error that not only leaves a raw, starchy taste but also creates an unstable structure prone to becoming rubbery. The key is to achieve complete starch gelatinization, a process that requires both high heat and sufficient time. When starch granules are heated in a liquid, they absorb it and swell. At around 93°C (200°F), they burst, releasing long starch molecules that entangle and form a thick gel network.
However, simply reaching this temperature isn’t enough. You must continue to whisk the thickened cream over the heat for a full one to two minutes after the first bubbles appear. This crucial final boil does two things. First, it cooks out the amylase, an enzyme present in egg yolks that can break down starch and cause your cream to turn watery after cooling. Second, and most importantly, it neutralizes the enzymes in the starch itself, eliminating any “pasty” or “floury” aftertaste and ensuring the gel is strong and stable.
A visual cue that this process is complete is when the swirl marks from your whisk no longer instantly disappear but hold their shape for a moment. This indicates that the gel structure is fully formed. Skipping this final minute is the primary reason for a weak set and the eventual onset of retrogradation—the process where starch molecules realign after cooling, squeezing out water and forming the dreaded rubbery texture.
How to Pour Hot Milk into Yolks Without Scrambling Them?
The tempering stage is where many pastry creams fail before they even begin, resulting in a grainy, lumpy texture. The danger lies in thermal shock. Egg yolk proteins are extremely sensitive to heat and, according to food science research, egg yolk proteins begin to coagulate at 65-70°C (149-158°F). Pouring hot milk (which is near boiling) directly onto the yolks will instantly raise their temperature past this point, causing them to scramble into tiny, cooked curds.
The professional technique to prevent this is called tempering. By adding the hot liquid to the egg mixture very slowly at first, you gently and gradually raise the temperature of the yolks, allowing them to acclimate without coagulating. The key is to whisk the yolk mixture continuously and vigorously with one hand while pouring a very thin, steady stream of hot milk with the other. Once about a third of the milk has been incorporated, the yolk mixture is sufficiently warmed and stabilized, and you can add the remaining milk more quickly.
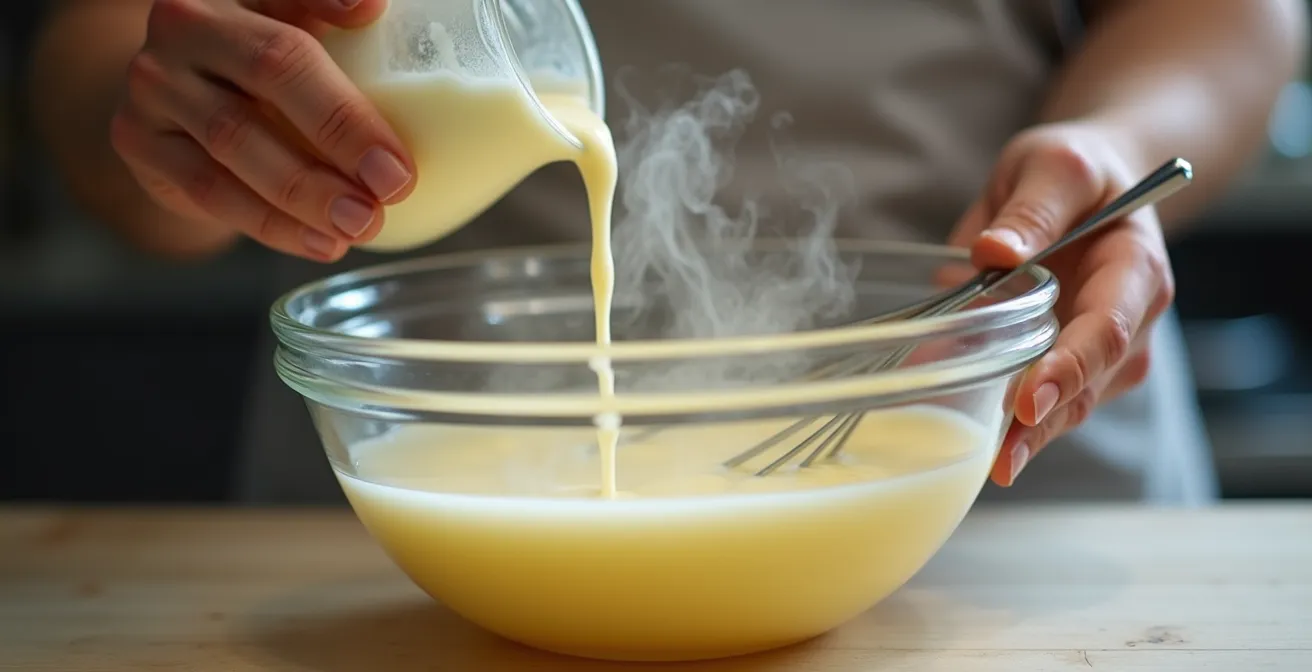
The secret weapon in this process is sugar. By whisking your yolks with sugar and starch *before* adding any liquid, you create a protective buffer around the delicate proteins, which significantly increases their coagulation temperature and provides a crucial margin for error.
The Protective Effect of Sugar on Egg Proteins
Research, as highlighted by a study on egg coagulation, demonstrates that mixing egg yolks with sugar before adding hot liquid creates a protective buffer around yolk proteins. This technique is more than just a step in a recipe; it’s a chemical safeguard. According to scientific analysis of custard making, this sugar buffer increases the coagulation temperature of the yolks by as much as 5-11°C (10-20°F). This provides a crucial safety margin that effectively prevents scrambling when tempering with hot milk, ensuring a smooth and homogenous base for your custard.
Cornstarch vs. Flour: Which Gives a Glossier Finish?
The choice of thickener is a defining factor for both the texture and appearance of your final pastry cream. While flour and cornstarch can both be used, they are not interchangeable and produce distinctly different results. The decision comes down to your desired outcome: a classic, pudding-like opacity or a modern, translucent gloss.
Cornstarch is pure starch. When cooked, it creates a gel that is translucent and has a high-gloss shine, which is highly desirable for modern tarts and fillings. It has a stronger thickening power than flour, so you need to use less of it. However, it is also more prone to retrogradation, meaning an over-reliance on cornstarch can contribute to that rubbery, Jell-O-like texture after a day or two in the fridge. Its flavor is also very neutral.
All-purpose flour, on the other hand, contains starch (about 70%) but also proteins and other components. This results in a more opaque, cream-colored, and slightly less firm set. The texture is often described as softer, “cakier,” and more traditional. Because its gel is less rigid, it is less susceptible to becoming rubbery upon cooling. However, you need to use more of it for the same thickening power, and it can impart a subtle “floury” taste if not fully cooked. Many professional pastry chefs use a blend—often a ratio of 80% cornstarch to 20% flour—to get the best of both worlds: the gloss and power of cornstarch with the stability and softer texture provided by flour.
The following table, based on an analysis of thickener properties, breaks down the key differences to help you make a strategic choice for your specific application.
| Property | Cornstarch | Flour |
|---|---|---|
| Composition | Pure starch (amylose/amylopectin) | 68-75% starch + proteins |
| Gel appearance | Translucent, glossy | Opaque, pudding-like |
| Retrogradation tendency | Higher (more rubbery if overused) | Lower (softer, cakey texture) |
| Thickening power | Stronger (use less) | Weaker (need more) |
| Professional blend ratio | 80% for gloss | 20% for stability |
The Plastic Wrap Mistake That Forms a Skin on Your Custard
Even a perfectly cooked pastry cream can be ruined during the cooling process. As the hot custard sits exposed to the air, it begins to evaporate. This process is the enemy of a smooth surface. As one food science expert explains:
Surface evaporation concentrates milk proteins (casein), which then denature and form a solid layer. The plastic wrap on contact prevents this evaporation.
– Food Science Research, The Science of Creme Patissiere
The common mistake is to simply drape a piece of plastic wrap over the top of the bowl. This traps steam, which then condenses into water droplets that fall onto the custard, creating a watery layer. The correct technique is to press the plastic wrap directly onto the entire surface of the hot pastry cream. This creates a physical barrier that completely prevents evaporation and skin formation.
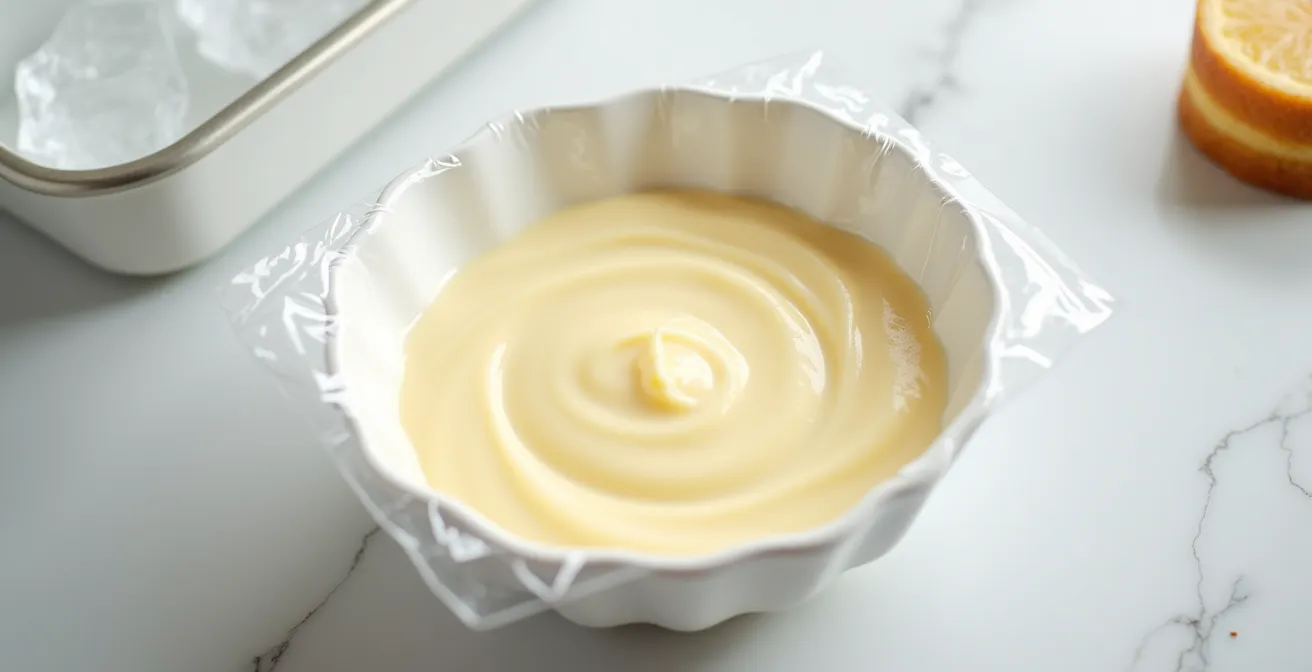
Furthermore, the speed of cooling is critical to preventing a rubbery texture. Allowing the cream to cool slowly at room temperature gives the starch molecules ample time to organize themselves into a tight, rigid network—a process known as retrogradation. To minimize this, you must cool the cream as rapidly as possible. The professional method is to use an ice bath. Transfer the hot cream to a shallow dish, cover it with plastic wrap on contact, and place it in a larger container filled with ice and water. This rapid chilling “freezes” the starch molecules in a disorganized state, resulting in a much softer, creamier set.
Your Action Plan: Professional Cooling Protocol to Prevent Skin Formation
- Press plastic wrap directly onto the hot custard surface, ensuring there are no air bubbles, not just over the bowl.
- Prepare an ice bath in a large bowl before you finish cooking the cream for rapid deployment.
- Transfer the finished hot cream immediately to a shallow bowl or pan and place it in the ice bath to accelerate cooling.
- After the cream is completely chilled, whisk it vigorously to break up the initial gel structure, restoring a smooth and pipeable consistency.
- For ultimate smoothness, push the finished cream through a fine-mesh sieve before cooling if you suspect any lumps have formed.
When to Remove Vanilla Pods to Prevent Bitter Aftertaste?
Using a real vanilla pod is the hallmark of a high-quality pastry cream, but its timing and handling are crucial for extracting maximum flavor without introducing unwanted bitterness. A vanilla pod contains not only the prized, aromatic compound vanillin but also tannins, which are naturally present in the woody part of the pod. If the pod is left in the hot milk for too long, these tannins will leach out, imparting a subtle but distinct bitter or astringent aftertaste to your finished cream.
The key is a two-part infusion strategy. First, split the vanilla pod lengthwise and scrape out the seeds. Add both the scraped pod and the seeds to the cold milk. For an even more intense flavor, you can let this infuse in the refrigerator for 30 minutes before heating. As you heat the milk, the rising temperature will begin to extract the volatile, aromatic compounds. The optimal moment to remove the pod is just as the milk reaches a simmer, right before you begin the tempering process or the final one-minute boil.
Professional pastry testing reveals a clear principle: maximum vanillin extraction occurs during the initial heating phase. Leaving the pod in during the final, vigorous boil with the starch and eggs does not add significantly more vanilla flavor but dramatically increases the risk of tannin leaching. By removing the pod just before the final boil, you lock in the pure, sweet vanilla aroma while leaving the potential bitterness behind. The tiny black seeds, of course, should remain in the cream for their visual appeal and concentrated flavor.
When to Add Spices: During Melting or Tempering for Better Release?
Beyond vanilla, other spices can elevate a pastry cream, but their flavors will be muted or lost entirely if added at the wrong time. The effectiveness of a spice infusion depends entirely on its chemical nature: is it fat-soluble or water/alcohol-soluble? Understanding this distinction is key to unlocking a vibrant, well-integrated flavor profile.
Fat-soluble spices release their flavor best when ‘bloomed’ in fat. The heat and fat work together to extract the aromatic oils efficiently.
– Tatyana’s Everyday Food, How to Make Vanilla Pastry Cream
This principle dictates that spices like cinnamon, nutmeg, cloves, and cardamom should be added to the milk during the initial heating stage. The butterfat in the milk acts as a solvent, and the heat helps to “bloom” the spices, fully extracting their aromatic oils and infusing them deeply into the cream. Adding ground spices later in the process, especially after thickening, can result in a gritty texture and a less potent flavor.
Conversely, flavorings that are delicate or suspended in alcohol, such as almond extract, citrus oils, or rosewater, are highly volatile. Their aromatic compounds will evaporate and be destroyed by high heat. These should always be stirred into the pastry cream *after* it has been cooked and has cooled slightly. Adding them during the boil would simply cook off all their flavor, leaving you with nothing. The following table provides a clear guide for when to add common flavorings for maximum impact.
| Spice Type | Solubility | When to Add | Why |
|---|---|---|---|
| Cinnamon, Nutmeg, Cloves | Fat-soluble | During milk heating | Heat + butterfat extract aromatic oils |
| Cardamom | Fat-soluble | During milk heating | Requires heat for oil release |
| Almond extract | Alcohol-based | After cooling | Volatile compounds evaporate if heated |
| Rosewater | Water-soluble | After cooling | Delicate compounds destroyed by heat |
| Ground spices | Mixed | During heating only | Avoid gritty texture from tempering |
How to Infuse Vanilla into Cream in 2 Hours Using Sous-Vide?
For the ultimate in flavor extraction and consistency, modern pastry chefs turn to sous-vide technology. This method offers unparalleled control, allowing you to infuse vanilla into a cream base with an intensity and depth that is difficult to achieve with traditional stovetop methods. The principle is based on a long, gentle infusion at a precisely controlled temperature in a sealed environment, which prevents any volatile aromatic compounds from escaping.
The process is remarkably straightforward yet scientifically sound. Instead of heating milk in a pot, you combine the milk, sugar, and a split-and-scraped vanilla pod directly into a vacuum-sealable bag. By removing all the air, you ensure maximum contact between the liquid and the vanilla pod. The bag is then submerged in an immersion circulator set to a precise, sub-boiling temperature.
The key to this technique is the exact temperature and time. Holding the mixture at 65°C (149°F) for two hours provides the perfect conditions for extracting the full spectrum of vanilla’s complex flavor notes without any risk of scalding the milk or leaching bitter tannins from the pod. This low-and-slow approach results in a base that is profoundly aromatic. The infused cream can then be used immediately in your standard pastry cream recipe, starting from the tempering step. This method guarantees zero aroma loss and a consistently perfect infusion every time.
- Combine your milk, sugar, and the split-and-scraped vanilla pod (both pod and seeds) into a vacuum-seal bag.
- Seal the bag, removing as much air as possible to ensure efficient infusion.
- Set your immersion circulator to precisely 65°C (149°F).
- Submerge the bag in the water bath and cook for exactly two hours.
- The result is a deeply infused base with unparalleled vanilla depth.
- Remove the pod and use the infused milk immediately in your pastry cream recipe for maximum flavor impact.
Key Takeaways
- The rubbery texture in pastry cream is caused by starch retrogradation, minimized by a full 1-minute boil and rapid cooling.
- Tempering yolks with sugar provides a protective buffer, raising their coagulation temperature and preventing scrambling.
- The final texture is a choice: cornstarch provides a translucent gloss, while flour gives a softer, more opaque result.
Why Do Your Éclairs Deflate Immediately After Taking Them Out of the Oven?
A perfect pastry cream deserves a perfect vessel, and few things are more disappointing than a batch of beautifully puffed éclairs or cream puffs collapsing into flat, sad discs the moment they leave the oven. This common problem is not due to a faulty recipe but to a misunderstanding of the structural science of choux pastry. The inflation is caused by steam trapped inside the dough. The pastry must be baked long enough for this internal structure to cook and dry out completely, creating a rigid, self-supporting shell.
If the éclairs are removed from the oven prematurely, their internal walls are still moist and weak. The cooler air outside the oven causes the internal steam to condense, creating a vacuum that the soft structure cannot withstand, leading to immediate collapse. The critical factor is ensuring the egg proteins within the dough have fully coagulated and the starches have set. For this to happen, choux pastry must reach a minimum of 175°F/79°C internal temperature to form a stable structure that won’t deflate.
While an instant-read thermometer is the most precise tool, there are several reliable sensory checks for doneness. The shells should be a deep golden-brown, feel surprisingly light for their size, and sound completely hollow when tapped on the bottom. A crucial professional technique is to vent the oven for the final 5-10 minutes of baking by propping the door open with a wooden spoon. This allows the internal steam to escape slowly, drying out the interior and solidifying the structure, which is the ultimate insurance against collapse. Never open the oven door for at least the first 25 minutes of baking, as the sudden temperature drop will cause an instant deflation from which the pastry cannot recover.
By shifting your focus from simply following steps to understanding the chemical and physical reactions at play, you gain true mastery over your craft. The difference between a rubbery, disappointing filling and a sublimely silky one lies in this deeper knowledge. You are no longer at the mercy of a recipe; you are a texture refinement specialist, capable of engineering the perfect result every time. Apply these principles of gelatinization, coagulation, and thermal control to transform your pastry work from hopeful to predictably excellent.