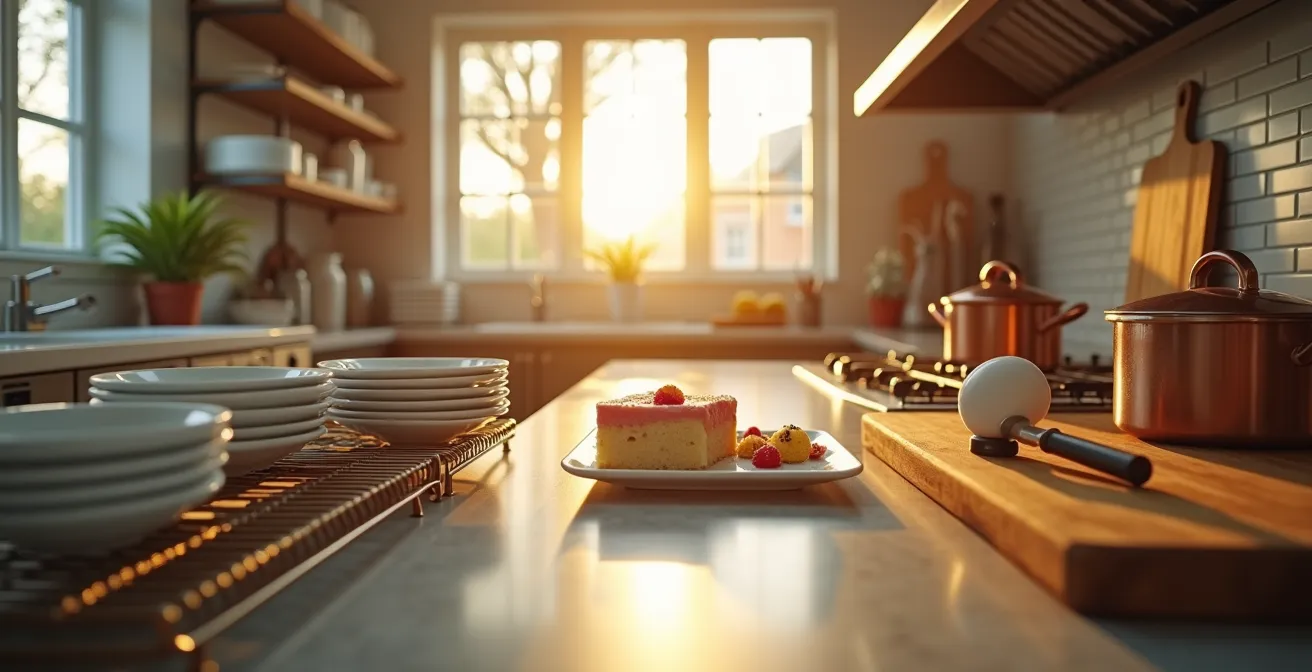
The anxiety of serving a last-minute dessert like molten chocolate cake stems from treating it as a cooking task, not a performance. The solution isn’t a simpler recipe; it’s adopting a professional’s mindset. By orchestrating a ‘service choreography’—a detailed timeline of preparation, temperature control, and plating—you can execute a flawless dessert service. This transforms a moment of stress into a seamless final act, allowing you to remain a present and composed host.
We’ve all been there. The main course plates are cleared, conversation is flowing, and a wave of quiet panic sets in. That show-stopping molten chocolate cake you promised is still a bowl of batter in the refrigerator. The thought of abandoning your guests, rushing into a hot kitchen, and praying the delicate cakes don’t overbake is enough to make any host anxious. You’re caught between wanting to impress and wanting to be present, a common dilemma for anyone who loves to entertain.
The standard advice often feels inadequate. “Prepare everything in advance” is a given, but it doesn’t solve the core issue of the ‘à la minute’ bake. Others might suggest choosing a simple, make-ahead dessert, but that sidesteps the desire to create a truly memorable, hot-and-cold dining experience. The real challenge isn’t just the recipe; it’s the logistics, timing, and pressure of a live performance in your own home.
But what if the secret wasn’t about being a faster cook, but a smarter strategist? What if the key to a stress-free dessert service lies in thinking less like a home cook and more like a hospitality manager? The principle is to move beyond simple ‘mise en place’ and embrace a full-fledged ‘service choreography’. This is a system where every step, from pre-scooping the ice cream to pre-chilling the plates, is timed and organized. It turns the final 15 minutes of cooking from a chaotic sprint into a calm, controlled, and impressive finale.
This guide will walk you through that professional methodology. We’ll deconstruct the process into manageable stages, covering everything from risk assessment of your dessert choice to the theatricality of plating. You’ll learn how to build a kitchen command center, maintain perfect sauce and ice cream temperatures, and execute the final bake with the confidence of a seasoned chef, ensuring you spend less time in the kitchen and more time with your guests.
Summary: Mastering the Art of Dessert Service
- Why is ‘Mise en Place’ the Secret to a Stress-Free Dessert Service?
- How to Keep Sauces Warm Without Forming a Skin?
- Cold Set vs. Baked à la Minute: Which is Safer for Large Groups?
- The Mistake of Plating Too Early That Melts the Ice Cream Garnish
- When to Plate at the Table for a Theatrical Effect?
- Molten Cake or Tart: Which Is Safer to Serve for a Party of 12?
- How to Organize Your Kitchen for a 2-Hour Chocolate Session Without Chaos?
- How to Create a Melting Chocolate Sphere Without It Breaking Prematurely?
Why is ‘Mise en Place’ the Secret to a Stress-Free Dessert Service?
In professional kitchens, ‘mise en place’—the practice of preparing and arranging all ingredients—is non-negotiable. For a dinner host, it’s the single most powerful tool for transforming a stressful dessert service into a smooth operation. This goes far beyond simply pre-measuring flour and sugar. It’s about creating a complete, time-stamped workflow for what I call the service choreography. This philosophy ensures that by the time your guests are finishing their main course, your role shifts from ‘cook’ to ‘expediter’. You are no longer creating, but simply assembling and executing the final steps of a well-rehearsed plan.
The goal is to eliminate decision-making under pressure. When the time comes, you shouldn’t be searching for the vanilla extract or wondering which plates to use. Every tool, garnish, and component should be in its designated place, ready for action. This systematic approach is proven to enhance efficiency. In fact, research in sustainability journals highlights that mise en place is a fundamental practice that promotes efficiency and minimizes waste, principles that are just as valuable in a home kitchen as in a five-star restaurant. By adopting this discipline, you are essentially front-loading all the cognitive effort to a time when you are calm and focused, hours before service.
Think of it as setting up dominoes. The preparation is the meticulous part, but when it’s time to go, you only need to provide a single, small push—sliding the molten cakes into the oven. The rest of the actions should flow naturally and predictably. Pre-scooped ice cream, ready-to-pour sauce, and organized plates mean the final assembly takes 60 seconds, not five chaotic minutes. This is the true secret to serving a complex dessert while remaining a calm, present host.
How to Keep Sauces Warm Without Forming a Skin?
A perfect molten cake deserves a perfect sauce, but a warm sauce left on the stove is prone to developing an unappetizing skin. This skin is the result of proteins denaturing and water evaporating from the surface. Professional chefs have several techniques to combat this, and they are easily adaptable for the home host. The most classic method is the ‘cartouche’—a small, custom-cut circle of parchment paper placed directly on the surface of the sauce. This simple barrier dramatically reduces evaporation and prevents the surface from oxidizing and forming a film, keeping your chocolate or caramel sauce pristine for hours.
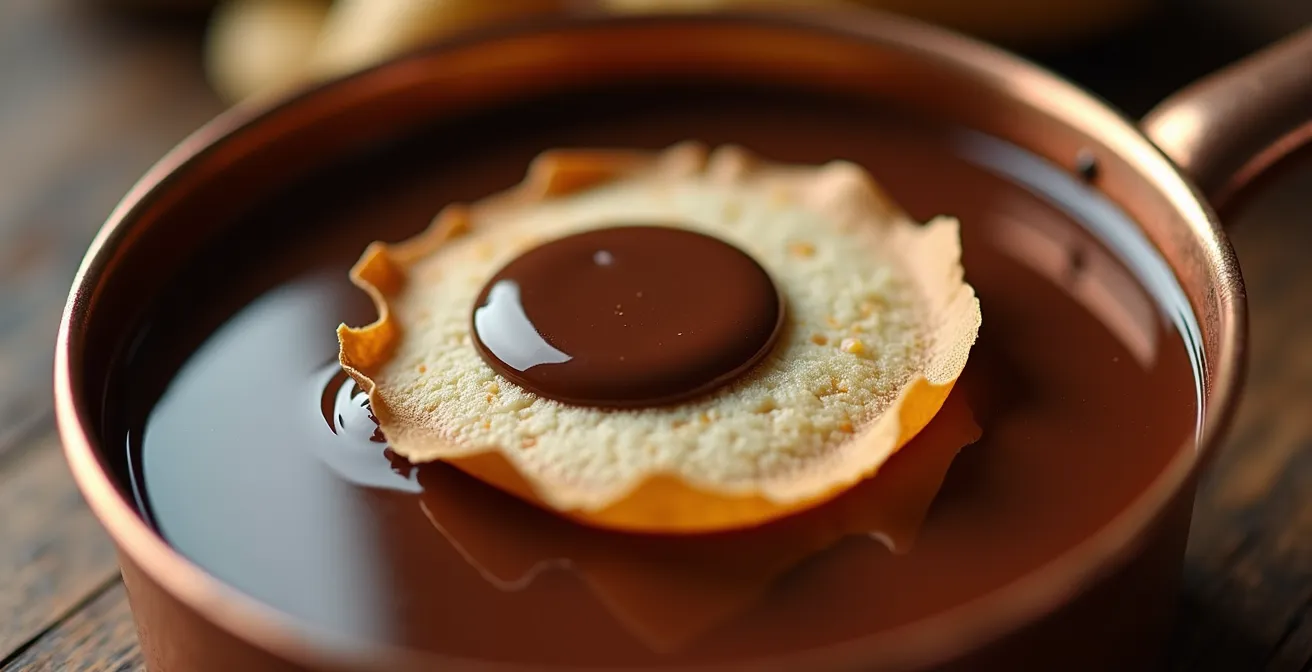
As the image demonstrates, the cartouche sits flush with the liquid, creating a protective layer. For even greater control and to free up stove space, you can take a cue from high-end catering. The goal is to hold the sauce at a stable, ready-to-serve temperature without continued direct heat. This is where you can leverage modern tools to create a more reliable system.
The Professional Chef’s Insulated Flask Method
Rather than occupying a burner, many professional kitchens maintain delicate sauces in high-quality vacuum flasks. The sauce is heated to its ideal serving temperature—around 65°C (149°F)—and then immediately transferred to a pre-warmed insulated flask. This method can hold a sauce at the perfect temperature and consistency for up to two hours without any quality degradation or risk of skinning. For a dinner party, this means your sauce can be made hours in advance and requires zero attention during the critical final moments of service.
By combining the cartouche with an off-heat method like an insulated flask, you are not just keeping a sauce warm; you are building a reliable component into your service choreography. This frees up both mental and physical space in the kitchen, allowing you to focus solely on the timing of the main event: the molten cakes.
Cold Set vs. Baked à la Minute: Which is Safer for Large Groups?
As a hospitality coach, I always advise hosts to conduct a ‘risk assessment’ of their menu. Serving a ‘baked à la minute’ dessert like a molten cake to a large group is a high-risk, high-reward proposition. The service window—the brief period where the cake is perfectly molten inside but set on the outside—is incredibly narrow. For a party of 12, this means 12 individual ramekins that must be baked, demolded, and plated within minutes. In contrast, a ‘cold set’ dessert like a panna cotta or a pre-baked tart shell that only needs filling offers a vastly wider margin for error. The choice is a strategic one, balancing impressiveness against executional risk.
This decision is about managing variables. An oven can have hot spots, leading to uneven baking. A slight miscalculation in timing can result in a fully cooked, disappointing chocolate cake instead of a molten one. There is virtually no recovery potential. A cold set dessert, however, is stable. If plating takes longer than expected, a panna cotta is still a panna cotta. Any minor imperfections can be easily masked with a sauce or garnish, offering high recovery potential. The following matrix breaks down this strategic choice.
The data in this table, derived from professional kitchen experience, helps visualize the trade-offs. As detailed in professional dessert guides, the molten cake’s fleeting perfection is its biggest vulnerability.
| Dessert Type | Service Window | Recovery Potential | Risk Level |
|---|---|---|---|
| Molten Cake | 3-5 minutes | Low – Cannot fix overbaking | High |
| Panna Cotta | 60+ minutes | High – Can add sauce/garnish | Low |
| Hybrid Tartlet | 30-45 minutes | Medium – Can torch or sauce | Medium |
Ultimately, the decision rests on your personal tolerance for risk and the goals of your event. Is the “wow” factor of a perfectly executed molten cake worth the potential stress? Or is the calm confidence of a beautiful, foolproof cold dessert a better fit for your hosting style? Answering this question honestly is a crucial part of your event planning.
The Mistake of Plating Too Early That Melts the Ice Cream Garnish
One of the most common and heartbreaking mistakes in dessert service is perfectly timing the hot component, only to fail the cold one. Plating a beautiful quenelle of ice cream or sorbet onto a room-temperature plate several minutes before the molten cake is ready is a recipe for a melted puddle. The visual and textural contrast is lost. The key to success is maintaining the cold chain integrity of your frozen garnish until the last possible second. This requires a precise timeline and the right environment.
The first step, which should happen hours in advance, is pre-scooping. Use a hot, dry scoop to form perfect balls or quenelles of ice cream and place them on a parchment-lined metal tray. This tray should immediately go into the coldest part of your freezer (the ‘deep freeze,’ ideally around -18°C or 0°F). By pre-portioning, you eliminate the frantic, messy struggle of scooping hard ice cream during the high-pressure service window. These frozen ‘pucks’ are your ready-to-plate assets.
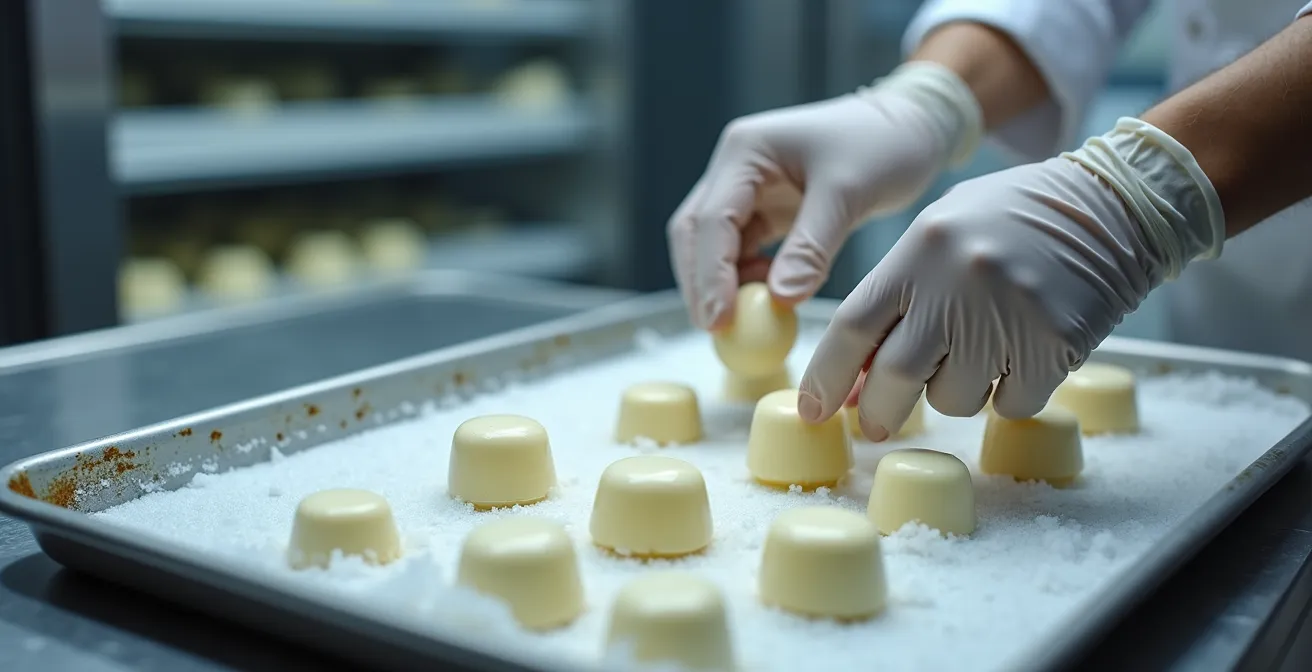
The second critical element is the plate itself. A room-temperature ceramic plate is a heat sink that will instantly begin to melt your perfectly frozen scoop. About 15-20 minutes before service, your dessert plates must go into the freezer. Plating a frozen scoop onto a frozen plate buys you precious minutes. The final transfer should be swift: the hot cake comes out of the oven, it is plated, and only then is the ice cream puck placed alongside it, just before the plate is carried out to the guest. This meticulous management of temperature is what separates amateur attempts from professional execution.
When to Plate at the Table for a Theatrical Effect?
In the world of hospitality, dessert is not just the end of the meal; it’s the final act. Bringing an element of the preparation to the table can create a memorable, theatrical moment that elevates the entire dining experience. However, this must be a calculated decision, not a chaotic one. Plating at the table should be reserved for simple, high-impact actions that enhance the dessert, rather than for complex tasks that turn the host into a flustered waiter. The goal is a touch of drama, not a full-on kitchen demonstration.
The best candidates for tableside execution are actions that involve a sensory transformation. For example, pouring a warm, glossy chocolate or caramel sauce over a cold component like ice cream or a neutral panna cotta. The visual of the sauce draping over the dessert, combined with the aroma it releases, creates an engaging moment for guests. Another powerful technique is the ‘reveal’ of a melting chocolate sphere, where the warm sauce is poured over the top to melt it and expose the dessert hidden inside. These are quick, clean, and visually stunning actions.
Conversely, tasks that are messy or require fine motor skills should be avoided. Attempting to quenelle ice cream, delicately place micro-garnishes, or slice a tart at the table is impractical and stressful. These tasks belong in your kitchen command center, where you have proper lighting, stability, and all your tools at hand. The rule of thumb is simple: if the action adds more drama than it does risk or mess, it’s a candidate for tableside theatre. If not, complete it in the kitchen. The final pour of a sauce or the final dusting of cocoa powder can be the perfect, low-stress way to bring a touch of the chef’s magic directly to your guests.
Molten Cake or Tart: Which Is Safer to Serve for a Party of 12?
Scaling up an ‘à la minute’ dessert for a dozen people magnifies the risk exponentially. While a single molten cake is manageable, orchestrating twelve requires military precision. The primary challenge is your home oven, which is unlikely to heat as evenly as a professional convection oven. This creates ‘hot spots’ that can cause some cakes to overbake while others are still raw. A tart, especially one constructed from modular components, offers a much safer and more forgiving path to success for a large party. It’s a classic case of calculated risk versus guaranteed success.
A large-format tart or individual mini tarts built in pre-baked shells have a significantly wider service window. The shells can be baked a day in advance. The filling, like a pastry cream or chocolate ganache, can be made in the morning. The final assembly and garnish can happen an hour before service without any degradation in quality. This modular approach dismantles the risk. If one mini tart’s garnish is imperfect, it doesn’t affect the other eleven. A single molten cake failure, however, can disrupt the entire service flow. The comparison below clearly illustrates the difference in executional pressure.
| Dessert | Perfect Service Window | Failure Points | Recovery Strategy |
|---|---|---|---|
| Molten Cake (12 portions) | 3-5 minutes | Uneven oven hot spots, timing variations | Cannot recover – must remake |
| Modular Mini Tarts | 30-60 minutes | Soggy bottoms if filled early | Add fresh filling, crisp topping |
| Large Format Tart | 45-60 minutes | Uneven slicing, structural issues | Cover with sauce, add garnish |
If your heart is set on the molten cake, a risk mitigation plan is essential. This involves building in backups and testing your system. Don’t let your party of 12 be your first attempt. The following checklist provides a framework for reducing the inherent risks of a high-stakes dessert.
Your Action Plan: Risk Mitigation for Party Desserts
- Test one molten cake first to calibrate the exact timing for your specific oven.
- Prepare backup ramekins with extra batter, ready to go in the oven in case of an initial failure.
- Use a modular approach where possible: serve individual portions rather than one large, hard-to-manage dessert.
- Pre-bake stable components, such as tart shells, and only perform the final filling or warming ‘à la minute’.
- Have ‘recovery garnishes’ on hand: extra sauce, whipped cream, or fresh fruit can elegantly conceal minor imperfections.
How to Organize Your Kitchen for a 2-Hour Chocolate Session Without Chaos?
A complex chocolate preparation, even one that only takes two hours, can leave a kitchen in a state of chaos. The key to avoiding this is to stop thinking of your kitchen as a single space and start treating it as a series of specialized workstations. This is how professional kitchens operate, and it’s a principle that dramatically reduces stress and mess. For a chocolate session, you should establish a logical workflow, often referred to as a Kitchen Command Center, with distinct zones for each stage of the process.
Start by creating a “hot zone” or ‘MELT’ station around your stove for melting the chocolate. Next to it, establish a ‘MIX’ station with your mixer and all pre-measured dry ingredients. A few feet away should be your ‘MOLD’ station, with prepared ramekins or molds lined up on a sheet pan for easy transport. Critically, you must also define ‘CLEAN’ and ‘DIRTY’ zones. The area to one side of your sink should be the designated drop zone for all used, chocolate-covered utensils. The counter on the other side must remain pristine, reserved only for clean tools and the final plating. This compartmentalization prevents cross-contamination and keeps you from having to stop and clean tools mid-process.
This disciplined organization is not just about tidiness; it’s about safety and efficiency. As kitchen organization studies show that crowded, disorganized environments restrict workflow and increase safety risks. By creating clear, dedicated stations, you build a physical system that guides your movements, making them more fluid and efficient. Using multiple, labeled timers—one for melting, one for mixing, one for a 2-minute cleanup sprint—adds another layer of control, turning a potentially chaotic session into a structured, manageable project.
Key Takeaways
- Embrace Service Choreography: Success lies in a detailed, timed plan (mise en place), not in rushing at the last minute.
- Control Your Temperatures: Use professional techniques like a ‘cartouche’ for hot sauces and pre-chilled plates for cold garnishes to maintain quality.
- Assess Your Risk: Honestly evaluate if a high-risk dessert (molten cake) fits your event and comfort level, or if a safer, modular option (tarts) is a better strategic choice.
How to Create a Melting Chocolate Sphere Without It Breaking Prematurely?
The melting chocolate sphere is the pinnacle of dessert theatre, but it is notoriously fragile. The secret to creating a sphere that looks beautiful and holds its shape until the final tableside pour lies in two professional secrets: perfect chocolate tempering and a two-part construction method. Tempering is the process of heating and cooling chocolate to specific temperatures to stabilize its cocoa butter crystals. Untempered chocolate will be soft, dull, and prone to breaking at room temperature. For a strong, glossy sphere, proper tempering is not optional.
The tempering process requires precision. For dark chocolate, this generally means melting it, letting it cool, and then gently reheating it to a working temperature. As a general guide, professional chocolate tempering requires the dark chocolate to be at a final working temperature of around 31°C (88°F) before it goes into the molds. Using a digital thermometer is essential for this process. Once tempered, the chocolate is poured into spherical silicone molds to create thin, even shells.
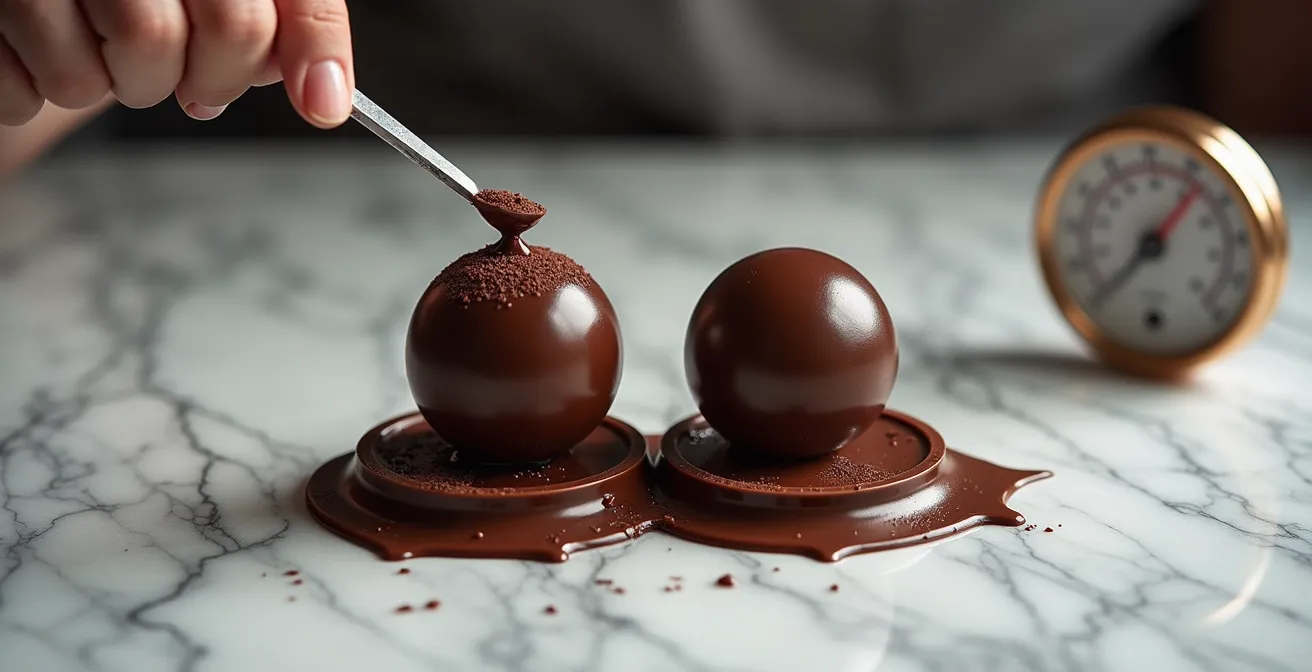
Even with perfect tempering, trying to de-mold a full, single-piece sphere is incredibly risky. This is where the second secret comes into play, as shown in the visual above and detailed in the following professional technique.
The Two-Halves Professional Technique for Chocolate Spheres
Instead of a single mold, pastry chefs create two separate half-spheres. This dramatically reduces the risk of breakage during de-molding. Once the two tempered chocolate hemispheres are fully set and removed from their molds, the rim of one half is gently warmed by placing it on a clean, warm plate for a second. It’s then immediately joined to the other half. The melted rim acts as an adhesive, welding the two pieces together to form a perfect, seamless sphere with near-zero risk of premature breakage.
This two-part method, combined with meticulous tempering, transforms a high-wire act into a reliable and repeatable procedure. It allows you to prepare the spheres well in advance, turning the highest-risk dessert element into a stable, ready-to-deploy asset for your final service choreography. Your next dinner party is the perfect opportunity to implement this service choreography. Start by choosing your dessert, assess the risks, and build your timeline. You’ll be amazed at how a professional workflow can transform a stressful moment into a triumphant finale.