In summary:
- Perfectly peeling hazelnuts isn’t the goal; it’s the first step in controlling flavor and texture like a professional chocolatier.
- Roasting at 350°F (175°C) for 10-15 minutes is the key to unlocking complex flavor compounds (pyrazines) and making skins easy to remove.
- Preserving crunch inside a chocolate requires specific techniques like pre-coating nuts and understanding moisture barriers.
- Proper storage in an airtight, frozen container is the only way to prevent rancidity and protect your investment.
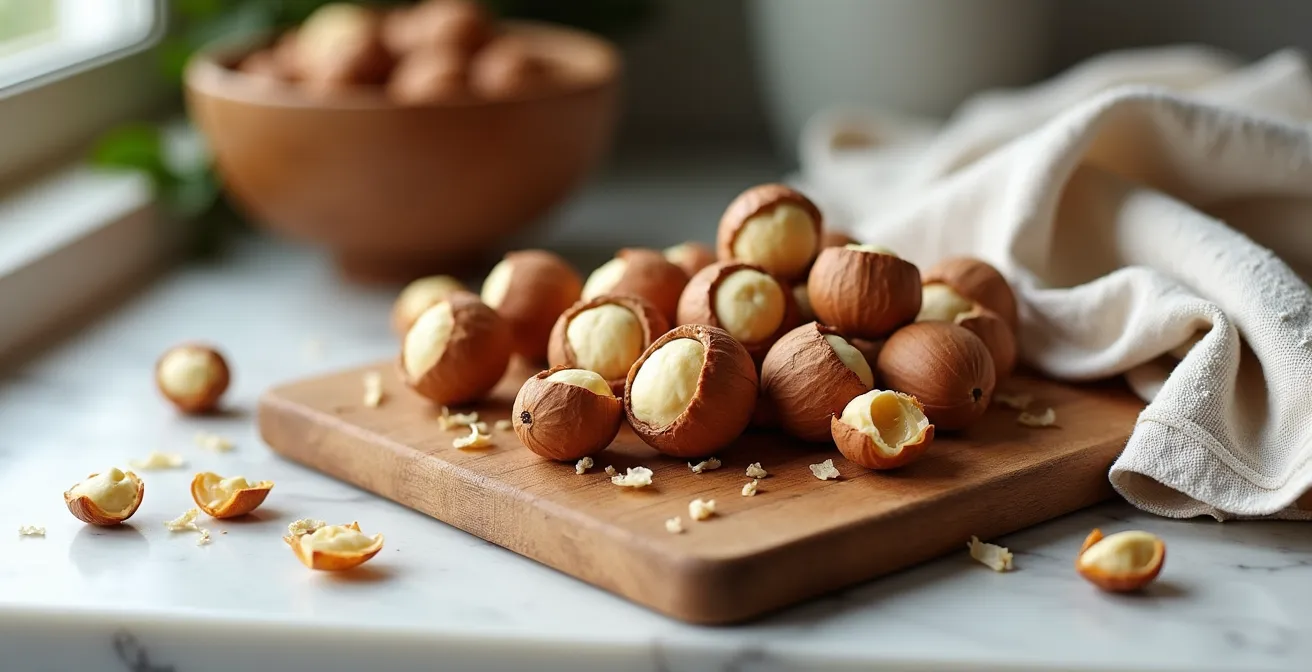
That familiar, frustrating dance: hot hazelnuts, a kitchen towel, and a cloud of papery skins that cling on for dear life. Every home baker knows the struggle. You’ve been told to roast them, rub them, and hope for the best. But what if the entire approach is wrong? What if the goal isn’t just to get the skins off, but to fundamentally transform the nut into a perfect textural component for high-end chocolates?
The common advice focuses on peeling as a chore to be completed. But professional chocolatiers see it as the first, crucial step in a process of texture control. They aren’t just removing a bitter skin; they are priming the nut for its role inside a delicate ganache or bonbon. They understand that the roasting time, the way it’s chopped, and how it’s stored are all levers to pull for creating that perfect, lasting crunch and deep, nutty flavor. Forget the brute-force towel method; it’s time to think like a kitchen hacker and a chocolatier.
This guide will take you beyond simple peeling. We will explore the science of flavor development during roasting, the techniques for creating a perfect caramel shell, the strategic choices between whole and crushed nuts, and the secrets to preserving that coveted crunch long after your chocolates are made. By the end, you won’t just have peeled hazelnuts; you’ll have mastered them.
This article breaks down the essential techniques used by professionals to turn a simple hazelnut into a star ingredient. Explore the sections below to master each step of the process.
Summary: How to Perfectly Peel Hazelnuts for Chocolate Making
- Why Does Roasting Hazelnuts for 10 Minutes Amplify Flavor by 200%?
- How to Coat Hazelnuts in Caramel Without Them Clumping Together?
- Whole vs. Crushed: Which Texture Works Best Inside a Bonbon?
- The Rancidity Mistake That Ruins Your Nut Stash in 4 Weeks
- When to Chop Hazelnuts: Before or After Roasting for Maximum Crunch?
- When to Add Chunks: The Last-Minute Fold Technique for Even Spread
- How to Add a ‘Surprise’ Crunch Element Inside a Soft Fondant?
- How to Roll Perfectly Round Truffles Without Melting Them in Your Hands?
Why Does Roasting Hazelnuts for 10 Minutes Amplify Flavor by 200%?
The primary reason for roasting hazelnuts isn’t just to loosen their stubborn skins; it’s a critical step in flavor chemistry. That incredible nutty aroma that fills your kitchen is the result of the Maillard reaction, a complex process where amino acids and sugars react at high temperatures. This reaction creates hundreds of new aroma and flavor compounds, most notably pyrazines, which are responsible for the characteristic roasted, nutty, and even chocolatey notes we crave.
The temperature and timing are not arbitrary. A landmark study on nut roasting highlights the science: roasting hazelnuts at 350°F (175°C) for 10-15 minutes hits the sweet spot. According to a 2020 study in the Journal of Food Science, this specific range provides the best crunch and flavor development without burning. Going too low results in a bland, raw taste, while going too high or for too long creates bitter compounds that will ruin your delicate chocolates. The 10-minute mark is when the skins begin to blister and crack, signaling that they are ready to release easily while the flavor inside has reached its peak potential.
Think of it as a controlled experiment: you’re not just applying heat, you’re orchestrating a chemical reaction. The skin acts as a protective layer, allowing the nut to roast evenly from the inside out. Once that signature golden-brown color appears and the nutty aroma intensifies, you’ve successfully unlocked the hazelnut’s full flavor profile, making the subsequent peeling process a simple, rewarding side effect.
How to Coat Hazelnuts in Caramel Without Them Clumping Together?
Once you have perfectly roasted and peeled hazelnuts, the next level of texture control is caramelization. Coating nuts in caramel does more than add sweetness; it creates a moisture barrier, protecting the nut’s crunch when it’s embedded in a moist ganache. However, the process can quickly devolve into a sticky, clumped mess. The key to perfectly separated, glossy nuts lies in choosing the right method: the dry burn or the wet caramel.
The “dry burn” method involves melting sugar directly in a pan. It’s faster and develops more intense, slightly bitter caramel notes, but it’s unforgiving and requires experience to prevent burning. The “wet caramel” method, where sugar is dissolved in water before heating, is much more beginner-friendly. The water helps the sugar heat evenly and significantly reduces the risk of crystallization, giving you more control over the final color and flavor.
Regardless of the method, the secret to avoiding clumps is to add the warm, roasted hazelnuts to the caramel *off the heat* and stir quickly and vigorously to coat each nut individually. Immediately pour them onto a silicone mat or greased parchment paper, and use two forks to separate them before the caramel hardens. This ensures each nut has its own protective, crunchy shell.
This table, based on professional pastry techniques, breaks down the choice. As this comparative analysis of caramel methods shows, your choice depends on your confidence and desired flavor profile.
| Aspect | Dry Burn Method | Wet Caramel Method |
|---|---|---|
| Temperature Control | More difficult, heats quickly | Easier, water moderates temperature |
| Flavor Intensity | More intense, deeper caramel notes | Milder, cleaner sweetness |
| Risk of Crystallization | Higher without interfering agents | Lower, water helps prevent crystals |
| Skill Level Required | Advanced – requires experience | Beginner-friendly with more control |
| Time to Amber Stage | 2-3 minutes once melting starts | 5-7 minutes total |
Whole vs. Crushed: Which Texture Works Best Inside a Bonbon?
The decision to use a whole hazelnut versus crushed pieces inside a bonbon is a critical question of textural design. A single, whole roasted hazelnut creates a dramatic, central crunch—a classic “noisette” experience. However, crushed hazelnuts offer a more integrated texture, distributing the crunch and flavor throughout the ganache. There is no single right answer; the choice depends on the experience you want to create.
For a perfect integration of crunch, professional chocolatiers have a specific technique. Instead of a food processor, which can quickly turn nuts into powder and release too much oil, they prefer to chop roasted hazelnuts with a sharp paring knife. This creates small, irregular pieces of about 3-5mm. This size is large enough to maintain a distinct “crunch-and-release” flavor burst but small enough to blend harmoniously with a smooth ganache without feeling gritty or oversized. Furthermore, to maximize longevity, many professionals pre-coat the crushed nuts in a thin layer of tempered chocolate. This creates a fat barrier, preventing moisture from the ganache from softening the nut and stopping oil from the nut from migrating into the ganache, which can cause bloom.
When it comes to shelf life, surface area is the enemy. Chopped or crushed nuts have more surface area exposed to air, making them go rancid much faster than whole nuts. Therefore, it’s best to store your hazelnuts whole and chop them only as needed. This preserves their freshness and ensures the crunch you worked so hard for actually lasts in the final product.
The Rancidity Mistake That Ruins Your Nut Stash in 4 Weeks
One of the most common and heartbreaking mistakes a home baker can make is improper storage. Hazelnuts, with their high content of unsaturated fats, are extremely susceptible to rancidity. Exposure to oxygen, light, and heat accelerates this process, turning your delicious, expensive nuts into a bitter, unpleasant mess in as little as four weeks. The tell-tale sign is a stale, paint-like smell. Once this happens, they are unsalvageable.
The pantry is the enemy of roasted nuts. Once opened, even in a sealed bag, the ambient temperature and light are enough to start the clock on rancidity. The solution is simple and absolute: cold storage. An airtight container is the first line of defense, but the temperature is what truly extends their life. According to storage recommendations for filberts, hazelnuts can be kept for up to six months in the refrigerator. For long-term storage, the freezer is your best friend. Properly stored in a vacuum-sealed bag or a truly airtight container, roasted hazelnuts can last for a year or even more without losing their flavor or texture.
A critical step often missed is allowing the nuts to cool completely after roasting before storing them. Sealing warm nuts traps condensation, which introduces moisture and is a fast track to spoilage and mold. By following a strict cooling and sealing protocol, you protect your investment and ensure you always have perfect, non-rancid hazelnuts ready for your next chocolate masterpiece.
Your Action Plan: Professional Freezer Storage Protocol for Hazelnuts
- Cool roasted hazelnuts completely at room temperature to prevent any condensation from forming inside the container.
- Place the cooled nuts in a high-quality airtight container or, for best results, a vacuum-sealed bag to eliminate air exposure.
- Label the container or bag with the roasting date to easily track their freshness and ensure you use them within their peak quality window.
- Store in the freezer at a consistent temperature; this can preserve their quality for up to one year.
- When ready to use, bring the nuts to room temperature *before* opening the container to prevent moisture from the air from condensing on the cold nuts.
When to Chop Hazelnuts: Before or After Roasting for Maximum Crunch?
The timing of when you chop your hazelnuts—before or after roasting—has a significant impact on both the final flavor and texture. While chopping raw nuts might seem more efficient, it’s a practice most professionals avoid. Chopping raw hazelnuts creates uneven pieces and exposes more surface area, leading to a higher risk of the smaller bits burning during the roasting process. This uneven cooking results in a mix of under-roasted, chewy pieces and burnt, bitter fragments.
The superior method is to roast the hazelnuts whole and chop them after they have cooled. Roasting them whole ensures even heat penetration, developing a deep, uniform flavor throughout the nut. Once roasted and peeled, the nut is more brittle and fractures cleanly when chopped with a sharp knife. This creates distinct, crunchy pieces with well-defined edges, rather than the mushy, oily texture that can result from chopping raw nuts. This “post-roast chop” is essential for achieving what chocolatiers call a clean “fracture”—a satisfying snap that is the hallmark of a high-quality nutty inclusion.

As you can see, the texture achieved from chopping after roasting is visibly superior. The goal is a perfect balance. As one expert source notes, the margin for error is small, which is why controlling every variable is so important.
Over-roasting can lead to bitterness, while under-roasting may leave the nuts chewy.
– Food Quality and Preference Journal
When to Add Chunks: The Last-Minute Fold Technique for Even Spread
You’ve perfected the roast, the peel, and the chop. Now comes the final, delicate dance: incorporating your hazelnut chunks into molten chocolate. The timing and technique here are critical to maintaining the chocolate’s temper and achieving an even distribution of nuts. Dumping cold nuts into perfectly tempered chocolate can cause it to “shock” and lose its shine and snap. Adding them too early in the melting process can make them soft.
The professional approach is the last-minute fold technique. This involves adding the roasted hazelnut chunks when the tempered chocolate is at its optimal viscosity—thick enough to suspend the nuts but fluid enough to coat them without clumping. For dark chocolate, this is typically between 29-31°C (84-88°F). The nuts should be at room temperature, not cold from the fridge, to minimize the temperature difference.
The folding motion itself is a gentle art. Instead of vigorous stirring, which can introduce air bubbles, use a spatula to bring the chocolate from the bottom of the bowl up and over the nuts, moving from the center outward. This motion gently coats the nuts and distributes them evenly without drastically altering the chocolate’s temperature. A professional technique for ensuring an even stronger crunch is to pre-coat the hazelnuts in a thin layer of tempered chocolate and let it set. These “seeded” nuts integrate more seamlessly into the final mixture.
- Ensure your chocolate is perfectly tempered and within its working temperature window (e.g., 29-31°C for dark chocolate).
- Add your room-temperature hazelnut chunks all at once into the center of the bowl.
- Using a spatula, gently fold the chocolate from the bottom of the bowl up and over the nuts.
- Move from the center of the bowl outwards to ensure even coating and distribution while minimizing temperature shock.
- Work quickly but gently to spread the mixture onto parchment paper before the chocolate begins to set.
How to Add a ‘Surprise’ Crunch Element Inside a Soft Fondant?
Introducing a crunchy element into a high-moisture environment like a soft fondant or a creamy filling presents a significant challenge: sogginess. The water content in the filling will naturally migrate to the dry, crunchy element, turning it soft and disappointing in a matter of days, or even hours. The key to creating a lasting “surprise” crunch is choosing the right crunchy element and protecting it with an encapsulation technique.
Different crunchy elements have varying levels of moisture resistance. Feuilletine (crushed crêpe flakes) is famously delicious but has very low resistance, turning soft almost immediately unless heavily coated in cocoa butter. Caramelized hazelnuts offer better longevity, but the ultimate crunch warrior is the toasted cacao nib, which is naturally low in moisture and high in fat, making it highly resistant to sogginess. An effective strategy is to create the fondant shell first, then add the protected crunch element. A thin coating of tempered chocolate or cocoa butter around your hazelnut piece acts as a waterproof jacket, a technique known as encapsulation. According to a technique detailed for homemade Nutella, incorporating chocolate-coated hazelnuts into a creamy mixture and then chilling it helps set the texture while preserving the crunch.
The choice of your crunchy element should be a deliberate one, based on the desired shelf life of your creation. This table outlines the stability of common crunch elements in high-moisture fillings.
| Crunch Element | Moisture Resistance | Longevity (Days) | Pre-treatment Required |
|---|---|---|---|
| Feuilletine | Very Low | 1-2 | Cocoa butter coating essential |
| Praligrain | Medium | 5-7 | Recommended coating |
| Caramelized Hazelnuts | Medium-High | 7-10 | Thin chocolate seal advised |
| Toasted Cacao Nibs | Very High | 14+ | Optional coating |
Key Takeaways
- Roast for Flavor, Not Just Peeling: Roasting at 350°F (175°C) for 10-15 minutes is a chemical process to develop pyrazines, the compounds behind deep, nutty flavor. Easy peeling is just a bonus.
- Control Texture with Coatings and Size: A thin caramel or chocolate coating acts as a moisture barrier to preserve crunch. The size of the chop (3-5mm) determines how the texture integrates into a ganache.
- Cold Storage is Non-Negotiable: Hazelnuts’ high fat content makes them prone to rancidity. Airtight containers in the freezer are the only way to protect their flavor and your investment for up to a year.
How to Roll Perfectly Round Truffles Without Melting Them in Your Hands?
The final hurdle for many home chocolatiers is rolling ganache into perfectly round truffles. The process often ends with a sticky, melted mess on your hands and misshapen lumps instead of elegant spheres. The problem is a simple matter of physics: the temperature differential. Your hands are around 98.6°F (37°C), while the ideal rolling temperature for a firm-but-pliable ganache is closer to 75°F (24°C). This difference causes the cocoa butter in the ganache to melt on contact.
Professionals overcome this with a two-stage rolling technique that minimizes contact time and heat transfer. First, they use a small ice cream scoop or melon baller to portion the chilled ganache onto a parchment-lined tray. These rough portions are then chilled again for about 15 minutes to firm up the exterior. This is the crucial step. By working with a very firm, cold exterior, you can quickly roll the truffle into a perfect sphere between your palms with minimal pressure before it has a chance to melt.
To further reduce heat transfer, work with only 3-4 truffles at a time, keeping the rest chilled. Roll them quickly, then return the finished batch to the refrigerator. For the ultimate professional touch, some chocolatiers use a chilled marble slab instead of their palms for the final roll, completely eliminating the heat from their hands. This methodical, temperature-conscious approach is the secret to achieving those flawless, perfectly round truffles every time.
By mastering each of these stages—from the scientific roast to the temperature-controlled final roll—you elevate yourself from someone who simply uses hazelnuts to a true creator who controls their every textural and flavorful nuance. You are no longer just peeling nuts; you are designing a complete sensory experience. This is the mindset of a chocolatier. Apply these techniques to your next project, and you will not only taste but feel the difference.