A broken, oily ganache is not a failure, but a reversible separation of fat and water caused by thermal shock.
- The key is to gently re-warm the mixture to the correct temperature window (90-110°F / 32-43°C).
- Use an immersion blender to apply controlled shear force, creating a stable, microscopic emulsion.
Recommendation: Instead of frantic whisking, trust the science of temperature and emulsification for a perfect fix.
There is no greater moment of panic in the kitchen than watching a bowl of what should be luscious, silky chocolate ganache turn into an oily, curdled mess. The fat separates, pooling on the surface, and the texture becomes grainy. Your mind races, thinking of the guests arriving soon and the dessert that now seems ruined. The common advice is often a frantic mix of “add more hot cream” or “whisk harder,” but these are shots in the dark that can sometimes make things worse. This isn’t about ratios alone; it’s about chemistry.
The truth is, a broken ganache is not a lost cause. It’s a simple, predictable, and—most importantly—fixable problem of physics. Ganache is an emulsion, a delicate suspension of fat (from the cocoa butter) in water (from the cream). When this emulsion breaks, it’s usually due to a phenomenon called thermal shock. The solution isn’t luck; it’s a calm and controlled process of re-establishing that stable mixture.
But what if the secret wasn’t just fixing the problem, but understanding the science so deeply that you could prevent it entirely and even elevate your confections to a professional level? This guide will not just give you the emergency fix. It will walk you through the science of emulsification, temperature control, and ingredient function. We will explore how to create a flawlessly elastic core, preserve delicate flavors, ensure your truffles are safe and shelf-stable, and achieve the perfect melt-in-the-mouth sensation every time.
This article provides a complete roadmap, from understanding the core problem of thermal shock to mastering the advanced techniques that define professional-quality chocolate work. The following sections break down each scientific principle into clear, actionable steps.
Summary: A Scientific Guide to Perfecting and Fixing Ganache
- Why Does Adding Cold Cream to Hot Chocolate Seize the Mixture?
- How to Create a Perfect Elastic Core Using an Immersion Blender?
- Cold Infusion vs. Hot Infusion: Which Preserves Fresh Herb Notes Best?
- The Water Activity Risk That Can Cause Mold Inside Your Truffles in 3 Days
- Butter or Glucose: Which Ingredient Best Improves the Melt-in-Mouth Sensation?
- Why Does Soy Sauce Enhance the Nuttiness of Dark Chocolate?
- The Temperature Mistake That Evaporates Delicate Fruit Notes Instantly
- How to Roll Perfectly Round Truffles Without Melting Them in Your Hands?
Why Does Adding Cold Cream to Hot Chocolate Seize the Mixture?
The primary culprit behind a seized or broken ganache is thermal shock. This occurs when two ingredients at drastically different temperatures are combined too quickly. When you pour cold cream into hot, melted chocolate, you force the fat in the chocolate—the cocoa butter—to crystallize rapidly and unevenly. Instead of forming a stable, smooth emulsion with the water in the cream, the fat clumps together, squeezing the water out and creating a grainy, oily separation. This is a physical reaction, not a chemical one, which is good news because it’s entirely reversible.
Cocoa butter is polymorphic, meaning it can solidify into several different crystal structures, each with a distinct melting point. Scientific research on chocolate tempering shows there are 6 different polymorphic forms with melting points ranging from 17°C to 36°C. A sudden drop in temperature forces the cocoa butter into unstable, low-melting-point crystal forms, leading to a seized texture. The goal is to encourage the formation of the stable “Form V” crystal, which provides the characteristic snap and gloss of well-tempered chocolate and the smooth texture of a perfect ganache.
To prevent this, the key is temperature management. You should never pour cold cream directly into hot chocolate. Instead, gently heat the cream to just below a simmer (around 180°F or 82°C) to ensure it’s hot enough to melt the chocolate evenly. Then, allow the cream to cool slightly before combining, and ensure the entire mixture stays within a safe working range of 90-110°F (32-43°C) during mixing. This controlled environment prevents the fat from panicking and allows it to emulsify beautifully with the water. If your ganache does break, the fix involves gently re-warming it back into this temperature sweet spot before re-emulsifying.
How to Create a Perfect Elastic Core Using an Immersion Blender?
Once your temperatures are correct, the next critical step is creating a stable emulsion. While a whisk can work, it often introduces too much air and isn’t efficient enough to create a truly fine, professional-grade emulsion. The secret weapon of chocolatiers is the immersion blender. It provides the perfect type of physical force—known as shear force—to break the fat globules from the cocoa butter into microscopic droplets, allowing them to be evenly suspended in the water from the cream.
This process creates a tight, elastic, and glossy ganache that is incredibly stable. The vortex created by the blender blade pulls the mixture down and forces it through the blades, emulsifying it far more effectively and with less air incorporation than whisking. This results in a ganache with a longer shelf life and a superior, silky mouthfeel. The visual of the vortex is a sign of a perfect emulsion being born.
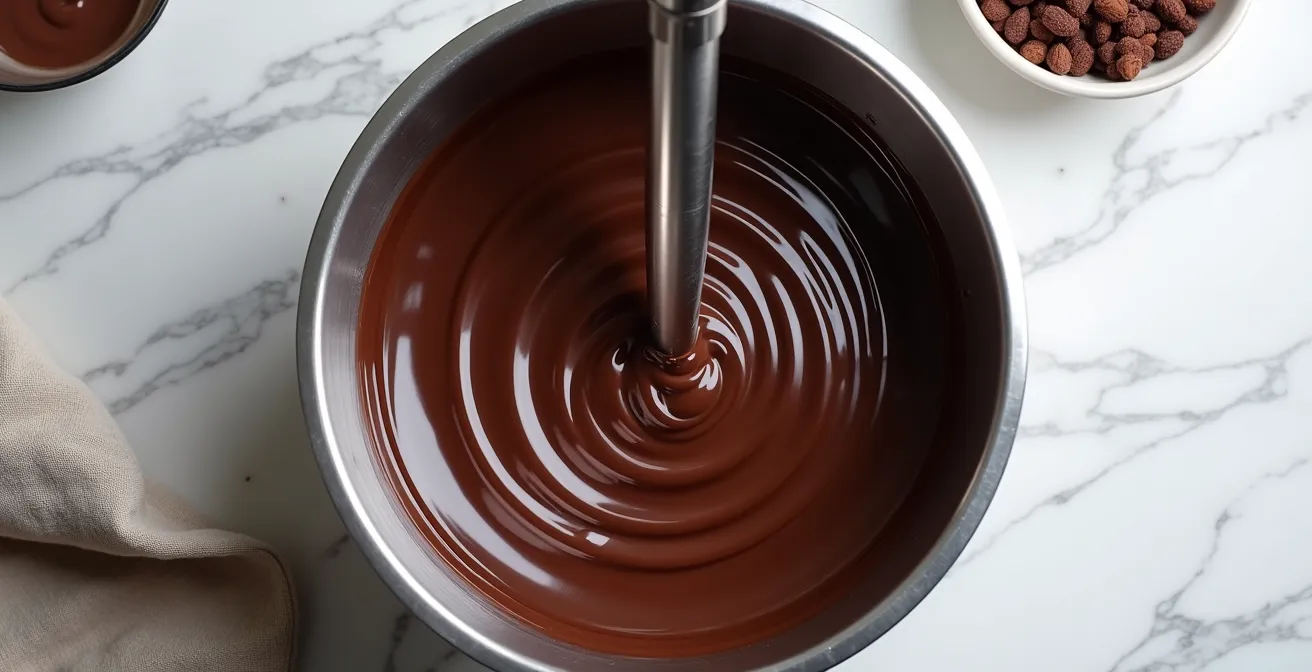
The technique is as important as the tool itself. You must keep the blender head fully submerged at all times to avoid incorporating air, which can compromise texture and shelf life. A gentle tilt of the bowl helps create a continuous, flowing vortex that ensures all parts of the mixture are processed evenly. This method is the difference between a homemade-tasting ganache and one with a truly professional finish.
Professional Technique: Chocolatier Chris Kollar’s Method
As demonstrated by professional chocolatier Chris Kollar, the proper technique is crucial for superior emulsification. He suggests starting with the immersion blender head fully submerged and centered in the bowl *before* turning it on. Begin at a medium speed while steadily rotating the bowl for about 15 seconds. Then, stop to scrape down the sides to ensure no unmixed parts remain. Finish by blending on high speed to create the final, ultra-fine emulsion. This method, sourced from a demonstration of professional ganache making, produces micron-sized fat droplets that are impossible to achieve by simple whisking.
Cold Infusion vs. Hot Infusion: Which Preserves Fresh Herb Notes Best?
Once you’ve mastered the basic ganache, you can begin exploring flavors. Infusing the cream is a classic way to do this, but the method you choose—hot or cold—has a dramatic impact on the final flavor profile, especially with delicate ingredients like fresh herbs. Cold infusion is unequivocally better for preserving the bright, volatile top notes of fresh herbs like mint and basil. These delicate aromatic compounds are easily destroyed by heat.
Hot infusion, which involves steeping ingredients like vanilla beans or cinnamon sticks in hot cream for a short period, is excellent for extracting deep, robust, and woody flavors. However, this same heat will cause the most fragrant compounds in fresh herbs to evaporate, leaving you with a cooked, vegetal taste rather than a fresh, vibrant one. Cold infusion involves steeping the herbs in cold cream in the refrigerator for 12 to 24 hours. This gentle, slow process extracts the fat-soluble flavor compounds into the cream’s fat without damaging them, resulting in a much brighter and more authentic flavor.
The choice of infusion method is a strategic decision based on the flavor profile you want to achieve. For the peak of freshness from ingredients like mint, basil, or citrus zest, the patience required for cold infusion pays off immensely. For spices and woody herbs, a quick hot infusion is more effective. Understanding this distinction is key to creating nuanced and intentional flavor combinations.
This comparative table, based on information from expert baking resources, breaks down the key differences between the two methods.
| Aspect | Cold Infusion | Hot Infusion |
|---|---|---|
| Temperature | 35-40°F (2-4°C) | 140-180°F (60-82°C) |
| Infusion Time | 12-24 hours | 5-10 minutes |
| Volatile Compounds Preserved | 95% of esters and terpenes | 30-40% of volatile compounds |
| Flavor Profile | Bright, fresh top notes | Deep, woody base notes |
| Protein Structure | Maintains original cream proteins | Partial denaturation possible |
| Best For | Mint, basil, citrus zest | Vanilla, cinnamon, cardamom |
The Water Activity Risk That Can Cause Mold Inside Your Truffles in 3 Days
A beautiful, silky ganache is one thing, but ensuring it remains safe to eat is another, more advanced challenge. The biggest threat to the shelf life of ganache-filled confections is not bacteria, but mold. Mold growth is directly tied to the amount of “free” water available in a product, a scientific measure known as water activity (aW). A high water activity means there is plenty of moisture available for microbial growth, and a classic ganache made only with chocolate and cream has a dangerously high aW.
This excess water can allow mold to grow inside a truffle in as little as three days, even if it looks perfect on the outside. To create a shelf-stable confection, professional chocolatiers focus on lowering the water activity of their ganache. They do this by adding ingredients that bind with the free water molecules, making them unavailable for mold. The most common ingredients for this are invert sugars (like glucose syrup or corn syrup) and alcohol. These not only lower the aW but also contribute to a smoother texture and enhanced flavor.
According to chocolate preservation guidelines, achieving a water activity below 0.85 is the critical threshold to prevent mold growth for up to four weeks at room temperature. For home bakers, simply adding a tablespoon or two of corn syrup or a spirit like rum to a ganache recipe can significantly extend its shelf life from a few days to several weeks. A final coating of well-tempered chocolate also acts as a physical barrier, protecting the ganache core from airborne mold spores and moisture.
Butter or Glucose: Which Ingredient Best Improves the Melt-in-Mouth Sensation?
Achieving the perfect texture and mouthfeel is the final frontier of ganache mastery. Two key ingredients, butter and glucose syrup, are often used to refine the texture, but they serve very different purposes. Choosing the right one depends on the specific problem you’re trying to solve. Glucose (or corn syrup) is primarily for smoothness, while butter is for adjusting the melt-in-the-mouth sensation.
If your ganache has a slightly grainy or crystalline texture, it’s a sign of sugar crystallization. Glucose syrup is an invert sugar, which means it actively interferes with the formation of sugar crystals. Adding a small amount of heated glucose to your ganache will help break down any existing crystals and prevent new ones from forming, resulting in a much smoother, silkier final product. It also helps to lower water activity, contributing to a longer shelf life.
Butter, on the other hand, is all about the melt. Butterfat has a lower melting point (around 32-35°C) than cocoa butter (34-38°C). By incorporating softened butter into your finished ganache (once it has cooled slightly), you effectively lower the overall melting point of the mixture. This creates a ganache that melts more quickly and luxuriously on the tongue, enhancing the melt-in-the-mouth experience. It’s a finishing touch that adds richness and a softer set. For the ultimate professional texture, many chocolatiers use both: glucose first for smoothness, then butter at the end for the perfect melt.
Your Action Plan: Diagnostic Guide for Texture Enhancement
- Assess the problem: Is your ganache grainy and crystalline, or is it smooth but simply too firm when set?
- Fix graininess: If the texture is grainy, the issue is sugar crystallization. Add 1-2 tablespoons of corn syrup or glucose, heated to boiling, and emulsify it into the ganache.
- Soften a firm set: If the texture is too hard, the melting point is too high. Incorporate 1-2 tablespoons of softened, room-temperature butter into the ganache.
- Test the melt point: Place a small amount of the finished ganache on your tongue. It should begin to melt smoothly within 3 seconds for a luxurious feel.
- Achieve professional texture: For the best of both worlds, add glucose during the emulsification process for smoothness, then finish by incorporating softened butter for a perfect melt.
Why Does Soy Sauce Enhance the Nuttiness of Dark Chocolate?
One of the most surprising yet effective flavor pairings in modern chocolate making is the combination of dark chocolate and umami-rich ingredients like soy sauce or miso. This might sound strange, but the science behind it is fascinating. Soy sauce does not make the chocolate taste salty or savory; instead, it acts as a flavor potentiator, suppressing bitterness and amplifying the deep, roasted, and nutty notes inherent in the chocolate itself.
Dark chocolate contains bitter compounds, but it also develops complex, savory notes during the roasting of the cocoa beans. Soy sauce is rich in glutamic acid, the molecule responsible for the fifth taste, umami. When introduced to the ganache, these umami compounds work to round out the flavor profile. They trick your palate into perceiving less bitterness, which in turn allows the more subtle, underlying flavors of the chocolate—like nuttiness, coffee, or dried fruit—to shine through more prominently.
However, incorporating a water-based ingredient like soy sauce into a fat-based emulsion can be risky. The key is to use a technique that allows for it, such as a water ganache.
Umami compounds like glutamic acid don’t add a new flavor but act as potentiators, suppressing bitterness perception while amplifying existing savory notes created during cocoa roasting.
– Paul A. Young, Professional Chocolatier Techniques
By replacing some or all of the cream with water, as chocolatier Paul A. Young demonstrates, you can create a stable emulsion that readily accepts other water-based flavorings like soy sauce or even tea. This advanced technique opens up a whole new world of savory-sweet combinations that are perfectly balanced and incredibly complex.
The Temperature Mistake That Evaporates Delicate Fruit Notes Instantly
When making fruit-flavored ganaches, temperature control becomes even more critical. The bright, fresh notes of fruit purees come from highly volatile aromatic compounds, particularly esters. These compounds are extremely sensitive to heat. The single biggest mistake that destroys fruit flavor is adding the puree when the ganache is too hot. Studies on flavor preservation have shown that many delicate fruit esters begin evaporating at temperatures as low as 140°F (60°C).
If you add your room-temperature raspberry or passion fruit puree to a ganache that is still steaming hot, you are essentially boiling off all the wonderful aromas before they even have a chance to be locked into the emulsion. The result is a ganache that might have the color of the fruit, but lacks its vibrant, fresh taste, leaving behind a muted, cooked-fruit flavor.
The correct technique is a sequential temperature approach. You must separate the heating stage (for safety and melting) from the flavoring stage. This ensures you get the best of both worlds: a safe, stable emulsion and a bright, intense fruit flavor. Here is a professional workflow to follow:
- Heat the Cream: Heat the cream alone to 180°F (82°C) to ensure it is sterilized and hot enough to melt the chocolate.
- Melt the Chocolate: Pour the hot cream over the chocolate, and let it sit undisturbed for 2-5 minutes to gently melt.
- Emulsify: Begin emulsifying with your immersion blender only when the mixture’s temperature has dropped to around 120°F (49°C).
- Add the Fruit: The most crucial step—wait until the ganache has cooled to 95°F (35°C) or below before blending in the room-temperature fruit puree. This temperature is low enough to preserve the delicate volatile compounds.
For an even more intense aroma, consider using freeze-dried fruit powder, which can be added at an even cooler temperature (around 85°F or 29°C) for maximum flavor retention.
Key Takeaways
- Emulsion is key: Ganache is a delicate balance of fat and water; temperature is the main destabilizer.
- The right tool for the job: An immersion blender provides the necessary shear force for a stable, professional-grade emulsion that a whisk cannot match.
- Control beyond the basics: Mastering water activity and infusion methods separates good ganache from great, long-lasting confections.
How to Roll Perfectly Round Truffles Without Melting Them in Your Hands?
The final challenge is shaping your perfect ganache into perfectly round truffles without them melting from the heat of your hands. This is a battle against thermodynamics, and winning it requires preparation and technique. The goal is to work with a ganache that has been properly crystallized into its most stable form, and to minimize heat transfer from your hands.
The stability of a set ganache comes from its cocoa butter crystals. For a firm truffle that holds its shape but melts beautifully in the mouth, you need to encourage the formation of stable Form V crystals. Chocolate polymorphism research indicates the ideal temperature for this is a cool room, between 60-68°F (16-20°C). Allowing your ganache to set slowly at this temperature for several hours (or overnight) is crucial. Rushing the process by putting it in the fridge will create brittle, unstable crystals.
Once the ganache is properly set, technique is everything. Professionals use several tricks to minimize melting. First, they use a small scoop or melon baller to portion the ganache, ensuring consistency and minimizing initial hand contact. Second, they often wear thin nitrile gloves, which act as a slight thermal barrier. The most important part is the rolling itself: use firm, quick pressure and roll the truffle between your palms for no more than 3-5 seconds. The goal is speed and efficiency. The longer the truffle is in your hands, the more it will melt and become sticky.
If the ganache starts to soften, don’t fight it. Place the truffles back in a cool place for 10-15 minutes to firm up before continuing. By combining a well-crystallized ganache with a cool environment and a quick, efficient rolling technique, you can produce perfectly round, professional-looking truffles every time.
Now that you understand the science of a stable ganache, you’re equipped to not only fix any crisis but to create confections with superior texture and flavor. Apply these principles to your next batch and master the art of the perfect emulsion.