Building a sophisticated chocolate menu isn’t about reducing richness, but about mastering sensory engineering.
- A successful dessert experience relies on a “palate arc,” guiding the taster from lighter to more intense flavors to prevent sensory overload.
- Textural and aromatic contrasts are the primary tools for creating lightness and preventing palate fatigue, even in rich compositions.
Recommendation: Focus on strategic preparation, precise serving temperatures, and make-ahead components to ensure flawless execution and a delightful guest experience.
The final course arrives. It’s a chocolate dessert, and a subtle wave of apprehension washes over your guests. They’ve enjoyed a wonderful three-course meal, and the thought of a dense, overly rich finale can feel less like a treat and more like a challenge. For any ambitious host, this is a common fear: crafting a dessert that is memorable for its sophistication, not its weight. The typical advice—serve smaller portions or simply add some berries—misses the point entirely. These are simple fixes, not elegant solutions.
The art of a great dessert menu, particularly one centered on chocolate, lies not in avoidance but in deliberate construction. It’s an exercise in sensory engineering, where every element is chosen with purpose. The true secret isn’t found in a single recipe but in understanding the interplay of intensity, texture, temperature, and aroma. It’s about creating a palate arc that guides your guests through a journey of flavors, ensuring the final note is one of satisfying complexity, not overwhelming saturation.
But what if the key to lightness wasn’t just using mousse, but understanding the very physics of its structure? What if the difference between a good dessert and a great one was a matter of a few degrees in serving temperature? This is the perspective of a menu engineer. It’s a shift from simply following a recipe to designing an experience.
This guide will deconstruct the principles used in fine-dining kitchens to build chocolate menus that are both indulgent and surprisingly light. We will explore how to sequence flavors, introduce textural surprises, manage preparation for large parties, and leverage temperature and spice to elevate your creations from merely “rich” to truly refined.
This article breaks down the core strategies for designing a balanced and impressive chocolate dessert experience. The following sections provide a roadmap, from foundational flavor theory to advanced plating concepts, allowing you to master each component of a professionally engineered menu.
Summary: A Menu Engineer’s Framework for Balanced Chocolate Desserts
- Why Start with Milk Chocolate Before Dark in a Tasting Menu?
- How to Add a ‘Surprise’ Crunch Element Inside a Soft Fondant?
- Molten Cake or Tart: Which Is Safer to Serve for a Party of 12?
- The Serving Temp Error That Mutes 50% of Your Mousse’s Flavor
- What Spices Pair Best with Chocolate for a Winter Warming Effect?
- Cold Set vs. Baked à la Minute: Which is Safer for Large Groups?
- Why Are ‘Retro’ Desserts Making a Comeback in Michelin Restaurants?
- Deconstructed Desserts: Genius Innovation or Lazy Plating in Modern Dining?
Why Start with Milk Chocolate Before Dark in a Tasting Menu?
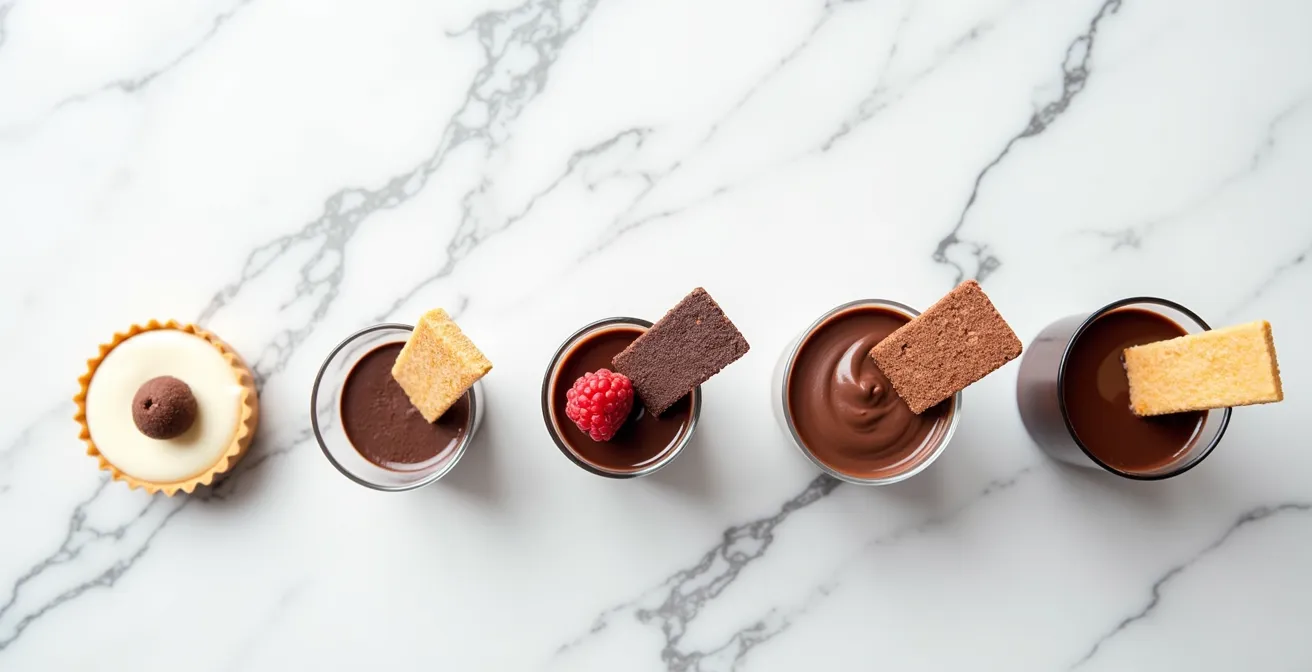
The foundational principle of any tasting menu—be it wine, cheese, or chocolate—is the management of palate fatigue. Starting with a high-percentage dark chocolate is the sensory equivalent of shouting in a quiet room; it immediately overwhelms the palate’s ability to discern subtler notes. A 75% cacao chocolate, with its bitter, roasted, and complex profile, will numb the taste buds to the delicate creamy, caramel, and dairy notes of a quality milk chocolate that might follow.
The correct approach is to design a “palate arc.” This involves starting with the most delicate flavors and gradually increasing intensity. A milk chocolate (35-45% cacao) serves as the ideal entry point. Its higher sugar and milk solid content provides a gentle introduction, allowing the taster to appreciate its nuanced character without being overpowered. From there, you can progress to a medium-dark (55-65%) before culminating in the intensity of a high-percentage (70-85%) dark chocolate. This calibrated progression ensures each chocolate is experienced to its full potential.
This isn’t just theory; it’s a structured methodology for tasting. Allowing a brief pause of two to three minutes and cleansing the palate with water or a plain cracker between significant jumps in cacao percentage is crucial. It resets the senses, preparing them for the next level of intensity. By respecting this sequence, you transform a simple tasting into a narrative experience, where each chapter builds on the last without spoiling the ending.
Your Action Plan: Engineering a Progressive Tasting Sequence
- Begin with lighter milk chocolate (35-45% cacao) at room temperature to establish a baseline.
- Allow 2-3 minutes between tastings for the palate to reset and prepare for the next intensity level.
- Progress to a medium-dark chocolate (55-65% cacao) to introduce more complex, roasted notes.
- Finish with a high-percentage dark chocolate (70-85% cacao) for the most intense and lingering flavor profile.
- Cleanse the palate with water or plain crackers between significant jumps in cacao percentage to ensure clarity.
Ultimately, this structured approach is the difference between simply eating chocolate and actively tasting it, a distinction that elevates the entire dessert experience for your guests.
How to Add a ‘Surprise’ Crunch Element Inside a Soft Fondant?
A classic chocolate fondant, or molten lava cake, delights with its singular texture: a soft, cakey exterior giving way to a liquid core. However, from a menu engineering perspective, a single texture can become monotonous. The introduction of a textural counterpoint—a surprise element of crunch—is a professional technique that elevates the dessert from simple to sophisticated. It creates a more dynamic and memorable eating experience.
The challenge is inserting a crunch that remains crisp even when surrounded by molten batter. The classic French solution is a chocolate feuilletine crunch. Feuilletine are finely crushed, caramelized crêpe flakes (like the shards of an ice cream cone) that provide a light, shattering crispness. When mixed with praline paste and melted chocolate, it forms a stable, crunchy layer that can be frozen into small discs. These discs can then be dropped into the center of the fondant batter before baking. As the fondant bakes, the exterior sets while the disc of feuilletine crunch remains intact, creating a hidden layer of texture.
This method is both elegant and practical. According to a professional guide on the technique, a chocolate feuilletine crunch is ready in minutes with only three ingredients: melted chocolate, praline paste, and the feuilletine flakes themselves. The resulting layer provides a light, crispy texture that contrasts beautifully with the soft cake and liquid center.
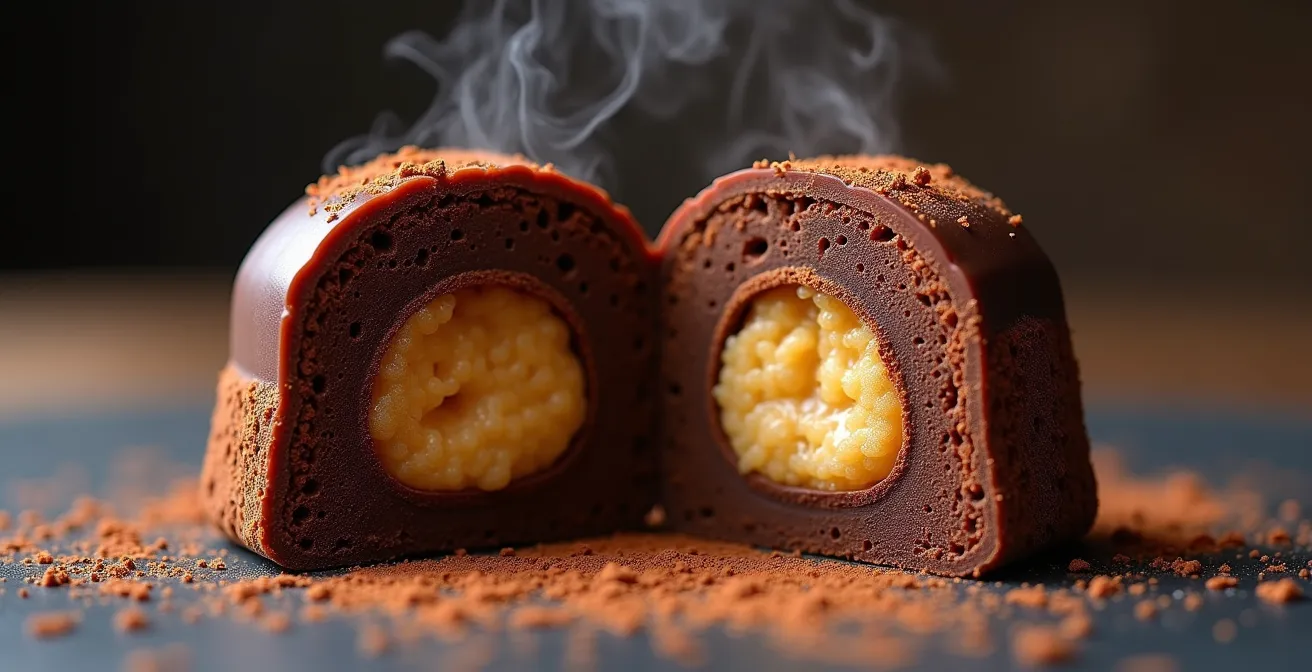
As the cross-section above illustrates, the goal is to create a distinct, self-contained layer of texture. This technique is not limited to fondants; it can be used in mousse, layer cakes, or tarts to introduce a professional-grade textural surprise that prevents the palate from becoming bored. It is a deliberate act of design that adds complexity and interest to every bite.
This small addition demonstrates a high level of thought and transforms a familiar dessert into an interactive discovery for your guests.
Molten Cake or Tart: Which Is Safer to Serve for a Party of 12?
When hosting a dinner party, especially for a larger group, the primary goal of the dessert course is a flawless, stress-free execution. Both a molten chocolate cake and a chocolate tart can be spectacular, but they present vastly different risk profiles from a service standpoint. The choice between them is a strategic decision that balances “wow factor” against operational safety.
A molten cake is a high-risk, high-reward dessert. Its success is entirely dependent on critical timing; thirty seconds too long in the oven and the molten center sets, turning it into a simple (and slightly disappointing) chocolate cake. For a party of 12, this would require baking in batches, juggling oven space and timers, and serving immediately. The service window is brutally short—five minutes at most—before the dessert loses its defining characteristic. For novices, the success rate is considerably lower.
Conversely, a chocolate tart is a low-risk, high-reliability option. The crust and filling can be prepared, and the entire tart fully assembled, up to 48 hours in advance. It requires no last-minute baking. A tart is stable at room temperature, offering a flexible service window of two hours or more. This removes the pressure of precise timing, allowing the host to focus on their guests rather than on an oven timer.
This comparison is clearly illustrated by data from professional baking resources. A comparative analysis from King Arthur Baking highlights the stark differences in make-ahead potential and service flexibility.
| Factor | Molten Cake | Chocolate Tart |
|---|---|---|
| Prep Time | 20 minutes active | 30 minutes active |
| Make-Ahead | Batter only (2 hours max) | Complete assembly (24-48 hours) |
| Baking Risk | High – timing critical | Low – stable result |
| Service Window | Immediate (5 min max) | Flexible (2+ hours) |
| Success Rate | 70-80% for novices | 95%+ success rate |
For those still wanting the molten effect without the risk, a clever professional workaround exists. As the King Arthur Baking Test Kitchen suggests:
We make these in mini muffin tins (instead of jumbo) and add chocolate wafers to the middle. This way, you won’t need to worry about the batter reaching the correct temperature, but you’ll still have a melty, molten center.
– King Arthur Baking Test Kitchen, 12 Quick and Easy Chocolate Recipes Guide
For a party of 12, the chocolate tart is unequivocally the safer and more strategic choice, guaranteeing a perfect result without any last-minute kitchen panic.
The Serving Temp Error That Mutes 50% of Your Mousse’s Flavor
A chocolate mousse is the classic “light” chocolate dessert, but its perceived lightness is a direct result of two factors: its aerated structure and its serving temperature. While most home cooks focus on achieving the right airy texture, they often neglect the critical role of temperature, a mistake that can easily mute half of the chocolate’s intended flavor profile.
The core issue lies in how our palate perceives flavor. Colder temperatures numb the taste buds and suppress the volatility of aromatic compounds. A mousse served straight from the coldest part of the refrigerator (around 35-40°F or 2-4°C) will have a firm, almost waxy texture. The fats in the cream and chocolate are solidified, trapping the delicate aromatic molecules. The flavor will be one-dimensional, dominated by sweetness and a hint of cocoa, while the complex floral, fruity, or nutty notes of a quality chocolate will be completely lost.
To unlock the full spectrum of flavor, a mousse must be served at the correct temperature. Experts at Valrhona, a premier chocolate manufacturer, state that the ideal tasting temperature for chocolate itself is close to body temperature. While a mousse must be served chilled for structural integrity, there is an optimal window. For a mousse, this is typically between 45-50°F (7-10°C). This requires pulling the mousse from the refrigerator 15-20 minutes before serving. This slight warming allows the cocoa butter to soften, releasing the trapped aromatic compounds and creating a silkier, more pleasant mouthfeel.
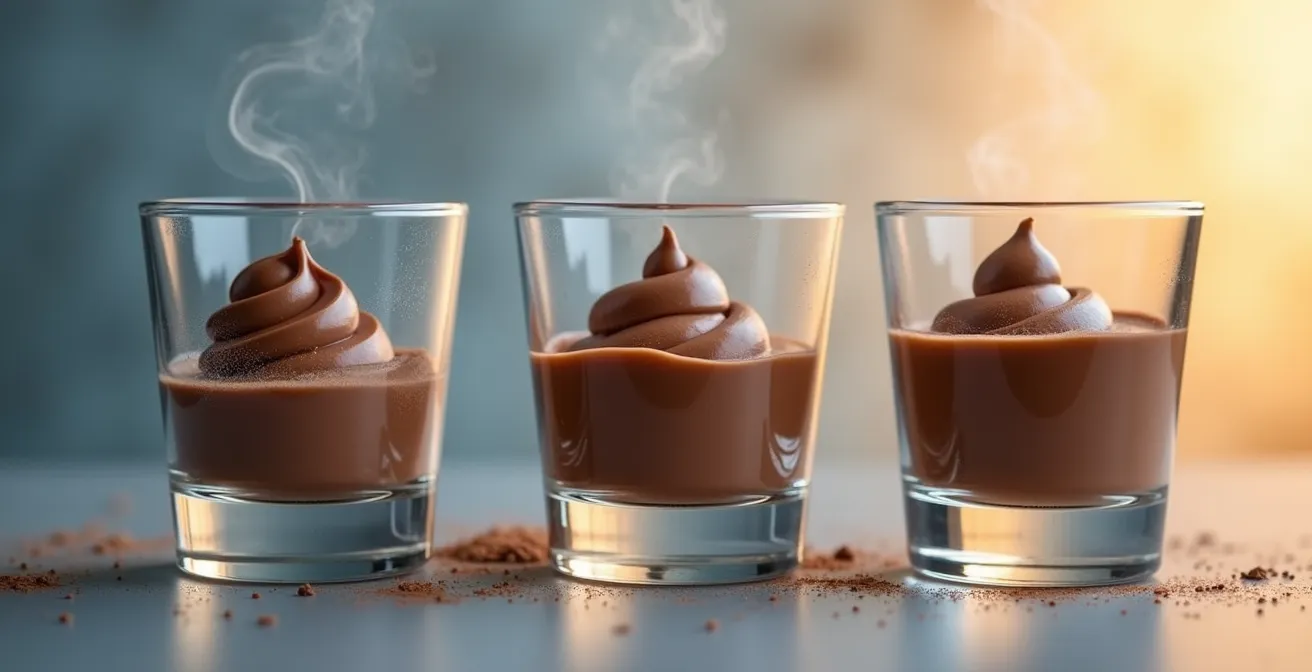
The visual progression from a cold, condensed glass to one with soft, luscious peaks demonstrates this principle. The structure of the mousse itself is also temperature-dependent. The air bubbles are trapped by a network of solidified fat particles from the cold cream. If the mousse gets too warm, this structure collapses. However, professional chocolatiers recommend an even warmer temperature for maximum flavor release in some contexts, with a serving temperature between 80-88°F (27-31°C) for certain preparations, though this is for professionals balancing structure and flavor at the highest level. For home use, a simple 15-minute rest outside the fridge is the key.
By simply adjusting the serving time, you can dramatically enhance the guest experience, presenting a mousse that is not only light in texture but also rich and complex in flavor.
What Spices Pair Best with Chocolate for a Winter Warming Effect?
In winter, a dessert’s role shifts from refreshing to comforting. When working with chocolate, the addition of specific spices can create an “aromatic lift,” introducing a warming effect that cuts through richness and adds a layer of sophisticated complexity. This is not about overwhelming the chocolate with heat, but about using spices to create a slow-building, lingering warmth and complementary aromatic notes.
While cinnamon and chili are common pairings, a menu engineer looks to a more nuanced pantry of spices. The goal is to find botanicals that offer more than just heat, contributing floral, citrus, or piney notes that resonate with the chocolate’s own profile. The key is in the application: infusing whole spices in the cream or adding finely ground spices directly to the ganache at a controlled ratio.
A professional pairing guide suggests several sophisticated options for achieving this warming effect:
- Long Pepper: Unlike the sharp heat of black pepper, long pepper provides a slow-building warmth with intriguing floral and musky notes. Adding just a quarter teaspoon of ground long pepper to a ganache is enough to create this effect.
- Grains of Paradise: These small seeds offer a complex flavor profile of black pepper, citrus, and cardamom. Infusing them in warm cream before making a mousse or sauce imparts a bright, peppery warmth.
- Juniper Berries: Crushed and steeped in cream, juniper adds clean, piney aromatics reminiscent of gin, which provides a beautiful, forest-like contrast to the earthiness of dark chocolate.
- Tonka Bean: Where its use is permitted, grating a small amount of tonka bean imparts powerful notes of vanilla, almond, and cherry, creating a luxurious and deeply comforting aroma that pairs exceptionally well with milk chocolate.
Even Michelin-starred restaurants use this principle of complementary flavors and subtle warmth. As Michelin Guide inspectors note in a review, a dessert featuring guava sorbet and coconut foam is elevated by a sprinkle of “sesame seeds, flecks of red chilli and a little black garlic, providing complementary flavours and a subtle warmth too.” This highlights the use of both spice and savory elements to create a complex, warming sensation. The full review showcases how top chefs balance these elements.
By moving beyond the obvious pairings, you can create a winter chocolate dessert that is not just a sweet ending, but a memorable, multi-sensory experience that provides genuine comfort and warmth.
Cold Set vs. Baked à la Minute: Which is Safer for Large Groups?
For a host planning a dessert for a large group, logistical scalability becomes more important than any single recipe. The choice between a “cold-set” dessert (like a mousse, panna cotta, or no-bake tart) and one “baked à la minute” (like a fondant or soufflé) is a critical strategic decision. The safer choice is overwhelmingly the one that removes last-minute variables and oven dependency.
Baked à la minute desserts are inherently difficult to scale in a home kitchen. Serving 20 portions of molten lava cakes would require continuous oven use for over 40 minutes, assuming you can bake in batches of four or five. Each batch demands precise timing, and a single mistake cannot be recovered. This approach also demands a high staff-to-guest ratio even in professional kitchens, with multiple people needed to coordinate baking, plating, and immediate service. It is a high-stress, high-risk endeavor for a host.
In contrast, cold-set desserts are designed for scalability and flexibility. A chocolate mousse or a large tart can be prepared entirely in the morning or even the day before. This decouples preparation time from service time. There is no oven requirement at service, freeing up critical kitchen resources. Furthermore, cold-set desserts have a much wider service window and are more forgiving. If plating takes longer than expected, the dessert’s quality does not degrade. As one professional workflow guide notes, you can easily make mousse in the morning for evening guests or even freeze individual portions.
An analysis of scalability for large groups clearly demonstrates the operational advantages of cold-set preparations, minimizing active time and staffing needs during service.
| Factor | Cold-Set (20 portions) | Baked à la Minute (20 portions) |
|---|---|---|
| Active Time | 45 minutes total | 15 min prep + 8 min per batch |
| Oven Requirement | None | Continuous for 40+ minutes |
| Error Recovery | Can adjust texture/presentation | No recovery if overbaked |
| Service Flexibility | +/- 2 hours window | Must serve within 5 minutes |
| Staff Needed | 1 person plating | 2-3 for timing/service |
For any host aiming for a smooth, successful event, the cold-set dessert is the superior strategic choice. It maximizes quality and guest experience by minimizing risk and last-minute labor, embodying the principle of “work smarter, not harder.”
Why Are ‘Retro’ Desserts Making a Comeback in Michelin Restaurants?
In the world of fine dining, which often prizes novelty and innovation, the recent resurgence of “retro” desserts might seem counterintuitive. Black Forest gâteau, tiramisu, and even elevated candy bar concepts are appearing on Michelin-starred menus. This trend is not driven by simple nostalgia, but by a sophisticated re-engineering of familiar concepts. Chefs are using these beloved flavor profiles as a foundation to showcase modern technique and create a powerful emotional connection with diners.
A retro dessert offers a unique advantage: it comes with a built-in set of positive associations. A flavor combination that reminds a diner of their childhood or a classic treat creates an immediate sense of comfort and delight. The innovation lies in how chefs deconstruct and refine these classics. They replace heavy buttercreams with aerated foams, use modern gelling agents for lighter textures, and present the familiar components with contemporary plating. The result is a dessert that is both emotionally resonant and technically impressive.
The Michelin Guide itself highlights this approach, describing a two-star dessert inspired by the British candy, Maltesers. It features an “intense hazelnut mousse…encased in a delicate milk chocolate shell and topped with incredibly light…shards of malt.” This is not a candy bar; it’s the *idea* of a candy bar, completely reimagined with superior ingredients and advanced technique. This dessert succeeds because it delivers a familiar, beloved flavor profile in a surprising and refined format.
This “retro revival” is made possible by a specific set of modern techniques:
- Deconstructing classic elements into separate, refined components.
- Replacing heavy creams with lighter, aerated mousses and foams.
- Using modern gelling agents like agar or gellan gum for lighter textures than traditional gelatin.
- Incorporating unexpected, sophisticated flavor pairings within the familiar framework.
- Utilizing contemporary, often minimalist, plating techniques to present the dessert in a new light.
By tapping into the power of memory while demonstrating technical skill, these reimagined classics offer a deeply satisfying experience that is often more memorable than a purely abstract, unfamiliar creation.
Key Takeaways
- Engineer the Palate Arc: Always sequence chocolate experiences from lowest to highest cacao percentage to prevent palate fatigue and allow every flavor note to be appreciated.
- Master Textural Contrast: A single texture becomes monotonous. Introduce a “surprise” element like a feuilletine crunch to create a dynamic, professional-grade dessert.
- Prioritize Service Safety: For groups, choose reliable make-ahead desserts (tarts, mousses) over high-risk, last-minute options (molten cakes) to guarantee a flawless and stress-free execution.
Deconstructed Desserts: Genius Innovation or Lazy Plating in Modern Dining?
Deconstructed desserts—where the components of a classic dish are presented separately on the plate—have become a polarizing topic in modern dining. For some, they represent lazy plating and a lack of coherence. For a menu engineer, however, a properly executed deconstruction is a tool of genius innovation. It is not about laziness; it is about purpose. It transforms a passive eating experience into an interactive one, inviting the diner to become a co-creator of their own bites.
The purpose of a successful deconstruction is to highlight the purity and quality of each individual component. By separating the elements of, for example, a Black Forest cake—a quenelle of chocolate mousse, a scattering of kirsch-soaked cherries, a dollop of whipped cream foam, a shard of chocolate “soil”—the chef allows the diner to appreciate each part on its own before combining them. This approach demands that every single element be perfectly executed. There is no room to hide imperfections within a layered cake.
Furthermore, it empowers the diner to control their own flavor journey. One bite might be pure chocolate mousse; the next might combine the mousse with the tartness of the cherry. This interactivity engages the diner on a deeper level. As noted by Great British Chefs, true innovation comes from understanding the ingredients, observing that “you can be endlessly innovative with chocolate, as different beans offer different flavour profiles for different dishes.” A deconstructed plate is the perfect canvas to showcase, for example, how a fruity Peruvian Chulucanas chocolate in a mousse contrasts with an earthy element elsewhere on the plate.
You can be endlessly innovative with chocolate, as different beans offer different flavour profiles for different dishes. The rich nutty Venezuelan Rio Caribe goes perfectly with stronger flavours like brandy or coffee, for example, while the fruity Peruvian Chulucanas can be showcased in a mousse. Just be aware that you need to handle chocolate delicately to preserve the fine flavour notes.
– Great British Chefs, Chocolate Dessert Innovation Guide
Armed with these engineering principles, you can now design your next chocolate dessert menu with the confidence of a professional, ensuring a memorable finale that is celebrated for its sophistication and balance.