The secret to a perfect, crack-free cheesecake isn’t the water bath; it’s understanding its structural engineering.
- Cracks are caused by thermal shock and improper protein structure, not a lack of steam.
- Mastering ingredient temperature, mixing technique, and a controlled cooling process makes the bain-marie redundant.
Recommendation: Focus on building a stable custard from the crust up. Control what goes into the batter and how it cools, and you will achieve a flawless result every time.
The dreaded water bath. For any home baker who loves cheesecake, those three words can bring on a wave of anxiety. The risk of a leaky springform pan, the unwieldy setup, and the potential for a soggy crust often make the entire process feel more like a high-stakes science experiment than a joyful baking session. The prevailing wisdom insists it’s the only way to prevent that catastrophic crack from splitting the surface of your beautiful chocolate cheesecake. But what if that’s not true?
What if the focus on the water bath is just a crutch, a workaround for deeper, more fundamental issues in the cheesecake’s structure? The truth is, a cheesecake is not just a cake; it’s a baked custard. Its integrity depends on a delicate balance of protein, fat, and moisture. Cracks are not a sign that you forgot the steam; they are a symptom of structural stress. This stress comes from rapid temperature changes, improperly managed moisture, and a weak protein network in the filling.
This guide will teach you to think like a pastry engineer. We will abandon the fussy bain-marie and instead focus on the core principles that *actually* prevent cracks. By controlling the physics and chemistry of your cheesecake from the ground up—from waterproofing the crust to managing the cooling curve—you’ll build a dessert that is structurally sound by design. The result is a dense, creamy, and flawlessly smooth chocolate cheesecake, achieved not by chance, but by mastery of the fundamentals.
This article breaks down the engineering behind a perfect cheesecake. Follow along as we deconstruct the common failure points and provide practical, no-fuss solutions to build a dessert that is as beautiful as it is delicious.
Summary: The No-Fuss Guide to a Perfect Chocolate Cheesecake
- Why Does Rapid Cooling Cause the Surface of Cheesecake to Split?
- How to Waterproof Your Crust to Keep It Crunchy Under the Filling?
- Cocoa Powder vs. Melted Chocolate: Which Makes a Denser Cheesecake?
- The Aeration Mistake That Causes Your Cheesecake to Deflate Later
- What Knife Temperature Ensures a Clean Cut Through Sticky Filling?
- Why Does Sous-Vide Prevent Chocolate from Burning or Seizing?
- Why Does Commercial Cream Cheese Contain Carob Bean Gum?
- Why Does Low-Fat Cream Cheese Ruin the Structure of Baked Cheesecakes?
Why Does Rapid Cooling Cause the Surface of Cheesecake to Split?
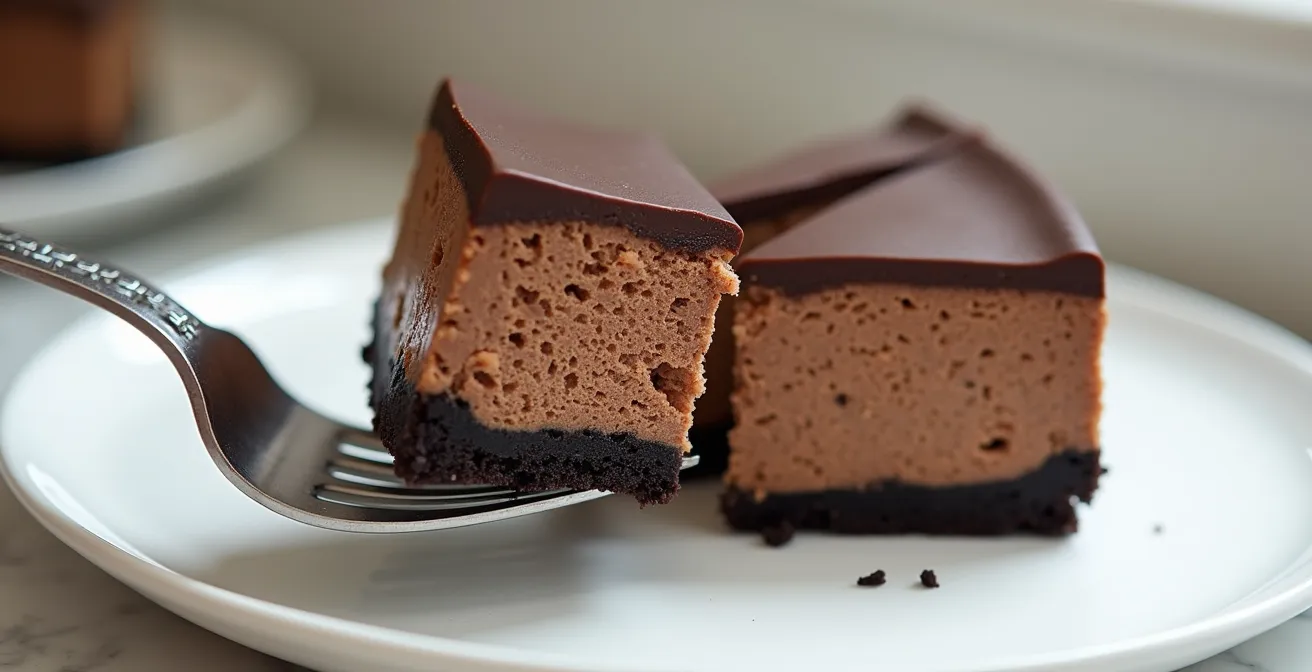
The primary culprit behind a cracked cheesecake is thermal shock. A cheesecake is a delicate egg-based custard. As it bakes, the egg proteins coagulate and set, forming a solid structure. If you pull it from a hot oven and expose it to cool room temperature air, the exterior of the cheesecake cools and contracts much faster than the still-hot, molten center. This differential shrinkage creates immense tension on the surface, which inevitably gives way and cracks.
The key to avoiding this is twofold: don’t overbake it, and cool it down gradually. An overbaked cheesecake is dry and rigid, making it more brittle and prone to cracking. The goal is to bake it until it is just set. A controlled test comparing cheesecakes baked at 325°F versus a higher 350°F found that the lower temperature produced a smoother, more evenly set texture. The perfect cheesecake should still have a slight wobble in the center when you gently shake the pan. For precision, aim for an internal temperature of 165°F to 170°F at the edge and 150°F to 155°F in the center. Any hotter, and you’ve entered the danger zone.
Once baked, the cooling process must be managed like a slow, controlled descent. Turn off the oven, crack the door open, and let the cheesecake cool inside for at least one hour. This allows the entire structure to cool and contract uniformly, relieving the surface tension that causes splits. Only after this initial cooling period should you move it to the counter to cool completely before refrigerating. This single step does more to prevent cracks than any water bath ever could.
How to Waterproof Your Crust to Keep It Crunchy Under the Filling?
A soggy crust is a common cheesecake tragedy. The filling is essentially a wet custard, and as it sits on the crust before and during baking, its moisture will inevitably seep down, turning your crunchy, buttery base into a soft, damp layer. Waterproofing the crust is a non-negotiable step for achieving textural contrast and structural integrity. A firm, dry base provides a stable platform for the filling, preventing it from slumping or becoming waterlogged.
The waterproofing process involves creating a moisture-repellent barrier between the crust and the filling. This is typically done after a brief pre-bake. Pre-baking the crust for about 8-10 minutes not only develops its flavor but also dries it out, making it less absorbent. While the crust is still hot from the oven, you can apply a barrier. A thin layer of melted chocolate is an excellent choice for a chocolate cheesecake, as it complements the flavor profile. Simply brush it over the base and up the sides. An egg white wash is another effective, flavor-neutral option. The egg white cooks on contact with the hot crust, forming a sealed, protein-based film.
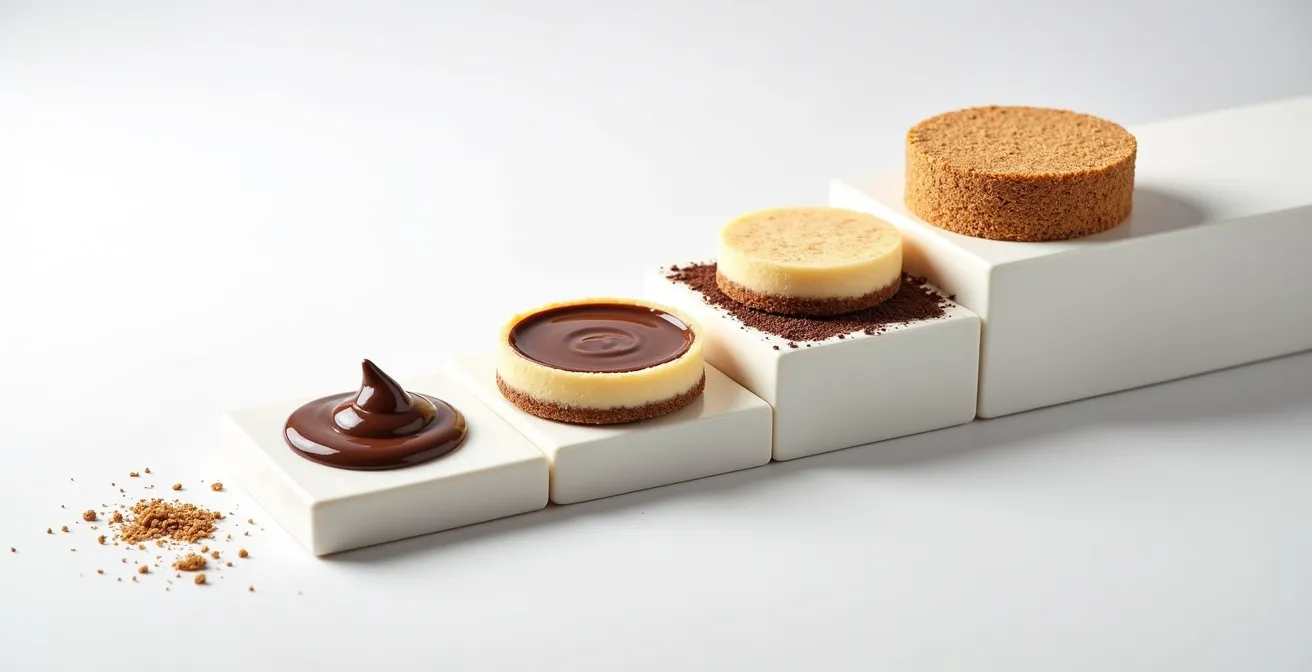
As you can see in the illustration, this creates a distinct, protective layer. For an extra layer of defense, especially with nut-based crusts, the natural oils in ground nuts like almonds or pecans also help repel moisture. The most important part of this process is patience: you must let the barrier cool and solidify completely before pouring in your cheesecake filling. Rushing this step will compromise the seal and defeat the purpose.
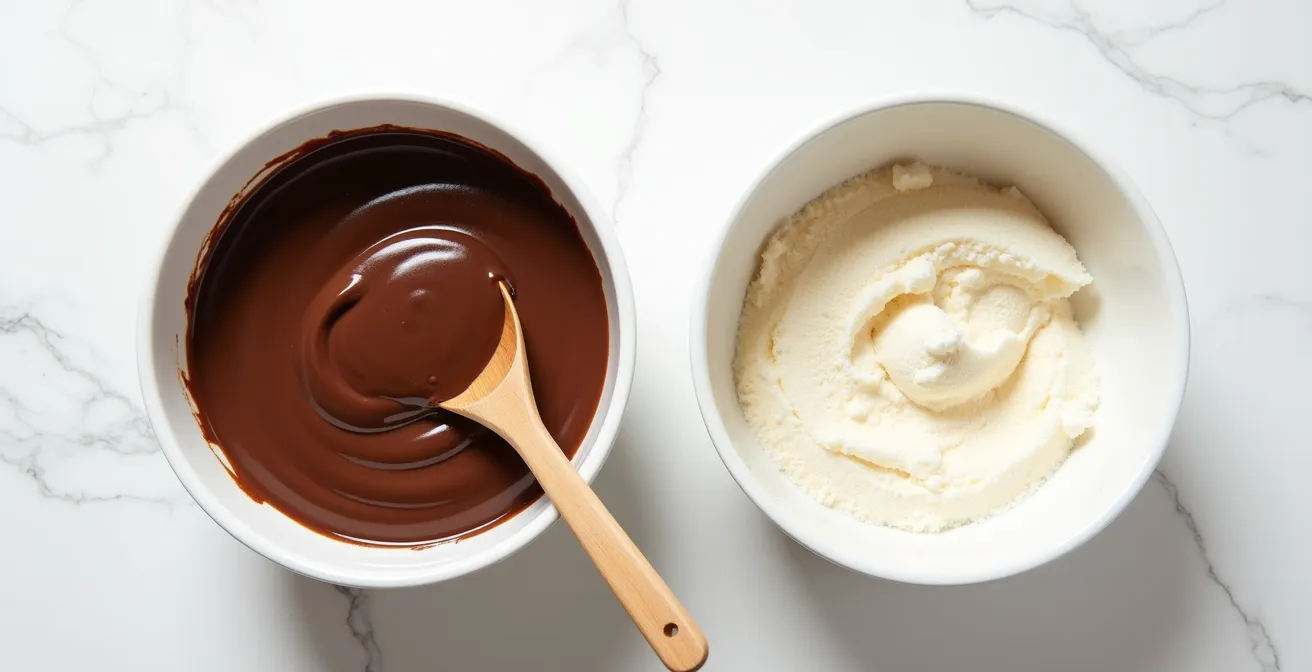
Cocoa Powder vs. Melted Chocolate: Which Makes a Denser Cheesecake?
The choice between cocoa powder and melted chocolate is about more than just flavor; it fundamentally alters the texture and density of your cheesecake. As professional baker Zoha points out, there is often a trade-off between taste and texture in chocolate cheesecakes. This is because each ingredient interacts with the batter’s moisture and protein network in a completely different way.
Most baked cheesecakes are too dry, crumbly and dense, and this is often worse in chocolate cheesecakes. You want to add lots of chocolate for flavor, but chocolate hardens up as it cools down, making the cheesecake feel dry. So it is often a trade-off between taste and texture, and most chocolate cheesecakes end up sacrificing the texture.
– Zoha, Professional Baker, Bake With Zoha
Melted chocolate, which contains cocoa butter, adds fat and moisture to the batter. This fat interferes with the egg and cream cheese proteins, preventing them from forming overly tight bonds. The result is a creamier, softer, and richer-tasting cheesecake. However, this delicate structure is also more prone to cracking if not handled carefully. Cocoa powder, on the other hand, is a dry ingredient. It actively absorbs free water in the batter, which tightens the protein network. This “water theft” results in a significantly denser, firmer, and almost fudgy texture. This increased density also gives the cheesecake higher structural integrity and makes it more resistant to cracking.
For a perfect balance, many recipes use both. Melted chocolate forms the rich flavor base, while a small amount of cocoa powder (2-3 tablespoons) acts as a structural binder, adding density and crack resistance without making the texture dry. Understanding this relationship allows you to engineer your desired texture.
| Property | Cocoa Powder | Melted Chocolate |
|---|---|---|
| Water absorption | High – actively absorbs free water | Low – adds moisture via cocoa butter |
| Texture result | Firmer, almost fudgy, denser | Creamier, richer, softer |
| Protein network | Tighter bonds due to water theft | Interrupted bonds from added fat |
| Structural integrity | Higher crack resistance | More delicate structure |
| Recommended usage | Add 2-3 tbsp as structural binder | Use as base for rich flavor (12 oz typical) |
The Aeration Mistake That Causes Your Cheesecake to Deflate Later
The advice to “not overmix” your cheesecake batter is one of the most common yet misunderstood tips. The real enemy isn’t the mixing itself; it’s aeration. Incorporating too much air into the batter is a fatal flaw that causes the cheesecake to rise like a soufflé in the oven and then tragically collapse and crack as it cools. When you whip the batter, especially after adding the eggs, you’re creating thousands of tiny air bubbles. These bubbles expand with heat, causing the cheesecake to puff up. As it cools, the bubbles contract and the entire structure deflates, creating stress that tears the surface apart.
The goal is a dense, smooth batter, not a light and foamy one. To achieve this, mix the cream cheese, sugar, and flavorings on a low speed until completely smooth and lump-free *before* adding the eggs. This initial step is where you can be more aggressive with mixing. However, once the eggs go in, your approach must change. As the Taste of Home Test Kitchen found, adding eggs last and mixing on the lowest speed until just combined is the most effective way to prevent excess air incorporation. The eggs should be a binder, not a leavening agent.
The visual difference is stark. A properly mixed batter is glossy, thick, and dense, like smooth mortar. An over-aerated batter will look foamy, matte, and full of tiny bubbles. By focusing on emulsification rather than aeration, you build a stable, dense custard that bakes evenly and cools without collapsing, eliminating a primary cause of cracks and ensuring a creamy, not spongy, texture.
What Knife Temperature Ensures a Clean Cut Through Sticky Filling?
After investing so much care into baking a structurally perfect, crack-free cheesecake, the final presentation can be ruined by a messy cut. A cold or dry knife will drag through the dense, sticky filling, smearing the cream cheese and crumbling the crust. The secret to a picture-perfect, clean slice lies in two simple principles: heat and hydration. A hot knife blade melts a microscopic layer of the filling on contact, allowing it to glide through with minimal resistance, while a clean, dry surface prevents any residue from sticking.
The process is methodical but simple. You need a thin, long, non-serrated knife, a tall glass of very hot water, and a paper towel. For every single cut, you must follow the same procedure. Dip the blade into the hot water for about 10 seconds, remove it, and then wipe it completely dry. The heat transfers from the water to the metal, creating the perfect temperature. Wiping it dry is a critical step; any water droplets left on the blade will mar the surface of the slice.
Once the knife is hot and dry, make your cut with a single, confident downward motion. Don’t saw back and forth. Press straight down to the crust, and pull the knife straight out. This methodical approach ensures that each slice has clean, sharp edges, preserving the beautiful texture you worked so hard to create. It’s a final flourish that honors the engineering that went into the bake.
Action Plan: The Perfect Slice Protocol
- Select the right tool: Use a thin, sharp, non-serrated knife for the cleanest cuts. A serrated edge will tear the filling.
- Prepare the heat source: Fill a tall glass or container (tall enough to submerge the blade) with very hot water.
- Heat the blade: Dip the knife into the hot water and let it sit for at least 10 seconds to absorb the heat.
- Ensure a dry surface: Remove the knife and wipe it completely dry with a clean paper towel. Do not skip this step.
- Execute the cut: Make your slice with one single, confident downward motion. Clean the knife and repeat the entire process for every subsequent cut.
Why Does Sous-Vide Prevent Chocolate from Burning or Seizing?
While this article focuses on ditching the water bath, it’s important to understand *why* it’s so often recommended. As the experts at King Arthur Baking note, a water bath is a reliable way to control temperature. They state, “It may take a bit more effort, but baking in a water bath is the most reliable way to prevent overbaking and keep your cheesecake from cracking.” The water acts as an insulator, shielding the cheesecake from the harsh, direct heat of the oven’s coils. This creates a gentle, humid environment where the temperature rises slowly and evenly, which is ideal for a delicate custard.
The term “sous-vide” in the title refers to this principle of precise temperature control. A sous-vide machine cooks food in a water bath held at an exact temperature, preventing any possibility of overcooking. A bain-marie in the oven is a lo-fi version of the same idea. It moderates the oven’s temperature fluctuations and ensures the cheesecake’s edges don’t bake faster than its center. This prevents the proteins from tightening too quickly and the custard from becoming rubbery or curdled—the same reasons it prevents chocolate from seizing or burning when melting.
However, the water bath is just one tool to achieve this goal. By understanding the principle—gentle, even heat—we can replicate the effect without the fuss. Baking at a lower temperature for a longer time (e.g., 325°F), placing a pan of hot water on a lower rack to introduce humidity, and allowing the cheesecake to cool slowly in the turned-off oven are all methods that achieve the same end goal. They all work to moderate temperature changes and give the custard the gentle environment it needs to set perfectly without structural stress.
Why Does Commercial Cream Cheese Contain Carob Bean Gum?
The choice of cream cheese is a critical engineering decision. Not all cream cheese is created equal, and the seemingly minor ingredients on the label can have a major impact on your cheesecake’s final structure. If you look at the ingredients list of a typical block of Philadelphia-style cream cheese, you’ll often find stabilizers like carob bean gum or xanthan gum. These are not just fillers; they are hydrocolloids that play a crucial role in moisture management.
These gums work by trapping free water molecules within the cheese, creating a more stable emulsion. This prevents the cream cheese from “weeping” or separating, ensuring a consistently smooth and thick texture. When used in a cheesecake batter, this built-in stability provides a significant advantage. It gives the batter an inherent resistance to breaking, curdling, or becoming grainy, especially when subjected to the heat of baking. This makes the ingredient far more forgiving for a home baker.
While it’s possible to make a cheesecake with gum-free cream cheese (like mascarpone or certain artisanal varieties), using a stabilized, block-style cream cheese provides a form of structural insurance. It helps maintain a smooth, homogenous protein network and reduces the risk of textural flaws. For a dense, New York-style cheesecake, full-fat, block cream cheese is the industry standard for a reason: its composition is perfectly engineered for the task.
Key Takeaways
- Cheesecake cracks are a structural failure caused by thermal shock and improper aeration, not a lack of steam.
- Building a stable cheesecake starts from the ground up with a waterproofed crust and ends with a slow, controlled cooling process.
- Ingredient choice is crucial: full-fat, stabilized cream cheese provides structural insurance, and a blend of cocoa and melted chocolate balances flavor and density.
Why Does Low-Fat Cream Cheese Ruin the Structure of Baked Cheesecakes?
If full-fat cream cheese is the hero of cheesecake structure, then low-fat cream cheese is the villain. Attempting to substitute low-fat or “lite” cream cheese—or, even worse, the whipped kind sold in tubs—is a guaranteed path to a structural catastrophe. The reason is simple: fat is a key structural component. It contributes to the rich flavor, creamy mouthfeel, and, most importantly, the dense, stable texture of a baked cheesecake.
Fat molecules intersperse themselves within the protein network of the eggs and cheese, providing tenderness and preventing the proteins from bonding too tightly and becoming tough or rubbery. Low-fat cream cheese has a much higher water content and a lower fat content. When baked, this excess water turns to steam and tries to escape, causing the cheesecake to become puffy, watery, and spongy. Upon cooling, it will shrink dramatically and is almost certain to crack and weep. The final texture will be grainy and weak, not dense and creamy.
Some methods try to compensate for a weak structure with a humid environment. For example, while some sources claim that water baths can reduce cracking by up to 90%, this is often because the humidity helps a weaker batter set more gently. However, a properly engineered batter made with full-fat ingredients doesn’t need this crutch. Its internal structure is robust enough to withstand the baking process on its own. For a baked cheesecake, there is no substitute for the structural integrity that only full-fat, block-style cream cheese can provide.
Now that you’re equipped with the engineering principles for a perfect cheesecake, you can confidently step into the kitchen, leaving the cumbersome water bath behind. Focus on building a stable structure from the foundation up, and you will be rewarded with a flawless, decadent dessert every time.
Frequently Asked Questions About How to Bake a Chocolate Cheesecake Without a Water Bath and Avoid Cracks?
What role do stabilizers play in commercial cream cheese?
Stabilizers like carob bean gum act as hydrocolloids that trap water molecules, preventing separation and creating a more stable emulsion for baking
How do stabilizers affect cheesecake texture?
They provide inherent resistance to breaking or becoming grainy, giving home bakers a more forgiving ingredient that maintains smooth texture
Are stabilizers necessary for crack-free cheesecake?
While not absolutely necessary, stabilized cream cheese offers insurance against common texture problems and structural failures